- Download and install the software.
- It will scan your computer for problems.
- The tool will then fix the issues that were found.
The latest version of Microsoft Windows, Windows 10, introduced some major changes including the removal of the Start menu. This change caused many people to complain about slow running speed. To solve this issue, you must use the partition manager tool to repair Windows 10 installation files.
First, download the free program called Partition Wizard Professional Edition. Then, run it and select “Repair Windows Installation Files”. Click Next button to continue. You will see a screen asking whether you want to repair the entire disk or just specific partitions. Choose the latter option and click next. On the following window, choose the location where you saved the downloaded file. Then, click Finish button to start repairing. When finished, restart your computer and enjoy fast running speed again.
Reasons for Windows 10 21H1 Problems
Windows 10 is one of the most popular operating systems around the world. However, it has been plagued with many issues since its release. Many people are still experiencing problems with the OS even after updating to the latest version. Here are some reasons why Windows 10 might be causing problems.
1. Hardware compatibility
If you have old hardware, then you might experience problems while installing the latest update. For example, if you use older graphics card, then you might encounter problems during installation. If you see errors like “The system cannot find the file specified”, then you should try upgrading the driver manually. You can do this by downloading the latest driver from the manufacturer’s site. This way, you ensure that your computer meets the requirements needed for the upgrade.
2. Software incompatibility
Some applications don’t work properly with Windows 10. For example, Adobe Photoshop CS6 does not run smoothly on the latest version of Windows. There are several possible causes for this issue. First, make sure that you have installed the latest version of the application. Second, if you are running 64-bit Windows, then make sure that you have 32-bit versions of the same applications. Third, make sure that you install the correct version of the application.
3. System instability
There could be multiple reasons behind system instability. One reason could be related to the amount of RAM that your PC uses. Make sure that you have enough memory space available. Another reason could be due to slow hard disk speeds. In such cases, you should consider replacing the hard drives.
How Can I Fix the Problems with Windows 10 21H1?
Windows 10 version 21H1 is now out. But it brings lots of problems. Some people say that upgrading to Windows 10 version 21H1 causes slow performance. Others say that there are some bugs and errors. And some people even claim that you cannot use Microsoft Edge anymore. If you want to fix those problems, here are some tips for you.
Upgrade to Windows 10 Version 21 H1 will cause many problems. You must try different methods to find the best solution.
First, check whether your computer meets the requirements of Windows 10 version 21H. If yes, you can upgrade directly without doing anything else. Otherwise, follow the steps below.
Step 3: Press Enter key to start repairing. Wait for the process to complete. Then restart your PC.
If you still face the problem, please do the following things step by step.
Method 1: Get the latest drivers for your PC.
To update your system drivers, just press Win+X keys, and select Device Manager from the menu bar. Then, scroll down to find out the device name of your hard disk, USB port, etc. Click on it, and choose Update Driver Software. Choose Browse my Computer, and locate the driver file you want to install. Double-click the downloaded file to start installing it. When the installation process finishes, reboot your computer.
Updated: July 2025
We highly recommend that you use this tool for your error. Furthermore, this tool detects and removes common computer errors, protects you from loss of files, malware, and hardware failures, and optimizes your device for maximum performance. This software will help you fix your PC problems and prevent others from happening again:
- Step 1 : Install PC Repair & Optimizer Tool (Windows 11, 10, 8, 7, XP, Vista).
- Step 2 : Click Start Scan to find out what issues are causing PC problems.
- Step 3 : Click on Repair All to correct all issues.

Method 2: Start the SFC Tool
If the system files are damaged and Windows cannot start properly, it could mean that there is a serious problem with the operating system itself. You might want to check out how to fix it manually. However, since repairing the OS takes some technical knowledge, we recommend that you use the System File Checker tool. This tool scans the entire hard disk drive and checks all the important system files. It finds missing or corrupt system files and repairs them automatically. To do this, just follow the steps below.
1. Download SFC from Microsoft.
2. Double-click sfc_v3.exe to launch it.
3. Click Next to accept the EULA.
4. Select the option Repair Disk Defects and Continue.
5. When prompted, select Yes to confirm that you want to continue scanning.
6. Once the process completes, you will see a summary screen indicating whether the issues were repaired successfully.
Method 3: Install the latest updates or patches for Windows.
To apply the latest Windows updates, you must use Microsoft Update. This method works best for computers running Windows 10 Home, Pro, Enterprise, Education, or Server editions. If you are unsure whether your computer meets the requirements, see our guide here.
1. Open “Control Panel”, type “Windows Update” into the Search bar, and press Enter.
2. Click “View update history”.
3. Select the most recent update(s), and click “Install updates”.
4. Wait for the installation process to complete. When finished, restart your PC.
5. Repeat Steps 2 – 4 until all required updates are installed.
6. Restart your PC again.
7. You’re done! Enjoy Windows 10.
Install the most recent Windows updates or patches on your system.
Microsoft releases regular security updates for Windows 10 PCs. These are called “patches,” and you’ll want to apply them regularly. If you don’t, there could be issues with your PC. Microsoft recommends checking out the list of recommended updates here. You can download the latest patch for Windows 10 directly from Microsoft.
There might be an issue with one of the latest Windows updates which needs to be fixed beforehand. This could cause problems with your computer while updating. To avoid those issues, make sure your computer is running well after installing all the updates, and check out our guide to fixing common Windows errors.
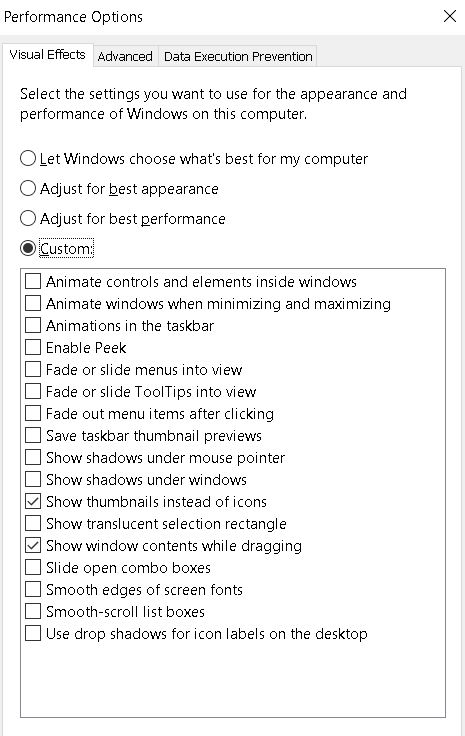
Set your PC’s visual effects to “Best Performance.”
The visual effects of your PC are very important because it affects the performance of your device. If you want to make sure that your PC runs smoothly, there are several things that you must do. You need to set the visual effects of your computer to the best performance. Here are some tips to help you achieve that goal.
1. Adjust the screen resolution
You can change the size of your display screen. Then select the one you prefer.
2. Change the color scheme
Windows 10 offers different themes that you can choose from. Choose the theme you like.
3. Turn off unnecessary programs
If you don’t use certain applications often, turn them off. For example, if you don’t play games regularly, you can disable the game bar. To access this option, open Start menu and type “game”. Click the icon that appears under Game Bar. Uncheck the box next to Show Game Bar.
Update the PC’s device drivers to the most recent versions and turn off any devices that are causing problems.
The sluggish behavior that occurs after you install Windows 10 Fall Creators update is caused by outdated device drivers. To fix it, make sure to update the driver versions to the latest releases from the manufacturers’ websites. Also, disable the conflicting devices such as Bluetooth adapters, Wi-Fi cards, and printers. This may help identify the culprit causing the problem.
Turn off the widget for News and Interests.
The news and interest widget is one of those features that you might never use. However, it does slow down the system, especially if you have many news sources and topics added to Cortana. If you want to disable the news and interests widget, here’s how:
1. Uncheck Show news and interests on Start menu.
2. Click Save changes.
3. Restart your PC.
4. You can now see the news and interests widget on the Start menu again.
Turn off your system’s ability to go to sleep.
Hibernate mode is a feature that allows Windows 10 devices to go into a low power state where it doesn’t use much energy. But sometimes, hibernation can cause problems like excessive memory usage, or even freezing up the system entirely. If you’re experiencing one of those problems, disabling hibernation might be what you need to do. Here are some steps to take.
1. Click the “Turn off hibernation” button.
2. Restart your device.
3. Check if the problem persists. If it does, try turning off Wi-Fi and cellular data connections, restarting again, and checking if the issue still occurs.
4. Try rebooting your computer completely. This could fix the problem.
5. If none of the above work, contact Microsoft support.
Stop Windows Search from running when the system starts up.
– If you are facing issues like “Windows Search Service is not responding”, “Search indexer cannot start because some services required for it are not enabled”, etc., then you must follow the steps mentioned below to fix the same.
– First of all, open the Task Manager and find out what process is causing the issue. You can do this by opening the Start menu and typing ‘Task Manager’ into the search bar. Click on the Processes tab.
– Next, select the process whose name starts with ‘WSearch’. Note down the PID number next to the process name.
In the list of programs, locate the program named ‘Microsoft Search Indexing Client’, and uncheck the box next to it.
– After doing this, restart your PC.
– Once done, check whether the issue is resolved or not.
Perform the DISM and SFC Scans of Your System
Windows 10 gets very slow on our systems if important Windows 10 files such as the OS itself, drivers, programs, etc., are corrupt or missing. In addition, some applications might not work properly due to corruption issues. To fix these problems, we recommend running a scan with the Disk Defragmenter tool. You can download it here.
The Disk Defragmenter utility helps you defragment hard drives, SSDs, USB flash drives, memory cards, and other removable storage devices. If you want to run a quick scan, use the Scan Now button. Otherwise, select Advanced Settings to perform a full scan.
If you find errors during the scanning process, you can repair them manually. However, if you encounter serious problems, you should contact Microsoft Support.
To learn how to do this, follow these steps:
1. Type “dism /online /cleanup-image /restorehealth”. Press Enter.
2. Reboot your computer.
Scan Your System for Malware
Malware scans are important because they let you know whether there’s anything malicious running on your machine. If there is something malicious, it’s best to clean it up immediately. But what if you don’t know where to start looking? Here are some tips to help you find out if your PC is infected.
1. Start with the obvious places. First, check your browser’s toolbar for suspicious activity. Look for advertisements that seem too good to be true. Also look for pop-up ads, which might contain malware. You can also use your antivirus program to scan your entire hard disk.
2. Check your email account. Anything unusual could indicate a problem. For example, if someone sends you an attachment that seems strange, open it in a different window. You can also run a virus scanner against your emails.
3. Scan your documents. Do you receive spam attachments? Are you getting phishing emails trying to steal personal information? These are signs that your computer is being targeted.
4. Try a free tool. There are many online tools that can detect malware. One common one is called VirusTotal. This site allows you to upload files, and it will analyze them for viruses. Another popular option is McAfee LiveSafe. This app uses artificial intelligence to scan files and folders.
5. Use a paid tool. Some experts recommend paying for a professional anti-malware tool like Bitdefender Total Security or Microsoft Defender Advanced Threat Protection. These programs are designed specifically for detecting malware. They can also provide additional security features such as parental controls, data backup, and remote management.
6. Back up your files. It’s always a good idea to keep copies of your most sensitive files somewhere else. If your computer crashes, you won’t lose everything.
Clean Boot Your PC and Disable/Remove the Conflicting Applications
A few days ago, I had to do a clean boot on my Windows 10 laptop because it was acting up, and it turned out that there was something wrong with the registry. My computer was slow, and I couldn’t open anything without getting errors. After doing some research online, I found out that the problem could be fixed by cleaning up the registry. So, I did just that. And now everything seems to work fine again. But, I’m still wondering why my computer was acting up in the first place.
I’ve been using Windows since version 3.0, and I’ve never experienced problems like this before. I don’t know what caused the problem, but I think it might have been one of those programs called “Opera GX Browser.” This browser doesn’t seem to affect me much, but apparently it does others. Some people say that disabling it fixes the problem, while others claim that it causes the same issues.
So, how do you fix a problem like this? Well, here are the steps that I took to clean up my system:
Step #1: Open the Start menu and type regedit into the search bar. You’ll see a list of options pop up. Click on the option labeled Regedit.exe.
Step #2: In the Registry Editor window, go to HKEY_LOCAL_MACHINE\SOFTWARE\Microsoft\Windows NT\CurrentVersion\Winlogon. Right-click on Winlogon and select Delete Key. Then press Enter. Repeat this step for each key under the Winlogon folder.
Step #3: Go to HKEY_CURRENT_USER\Software\Microsoft\Windows\CurrentVersion\RunOnce. Right-click on RunOnce and select New. Type in the name of the program that you want to disable, such as Opera GX Browser. Select the value DataExecute from the dropdown menu. Press OK.
Step #4: Close the Registry Editor and reboot your computer.
RECOMMENATION: Click here for help with Windows errors.
Frequently Asked Questions
Does Microsoft check how safe its software is before giving away free updates?
Yes! Every day, they look for security holes in their software. If they find any, they take care of them right away.
Why Should I Install Windows Updates?
If you don’t keep your computer up to date, viruses could be hiding in your system, waiting for a chance to attack. Your operating system may ask you to download security patches when you install new software or update existing programs. These patches are made to keep bad code from getting on your PC.