- Download and install the software.
- It will scan your computer for problems.
- The tool will then fix the issues that were found.
Wi-Fi issues are quite common among Windows 10 users. However, there are some ways you can solve it without having to reinstall your operating system. In this article we’ll show you how to fix Wi-Fi connectivity problems on Windows 10 version 22H2.
First things first, let’s talk about what causes Wi-Fi connection problems. There are many reasons why you might experience such issues, including outdated drivers, faulty hardware, incorrect network settings, etc. Let’s go over each one of those possibilities.
If you’re experiencing Wi-Fi problems on your PC, the most likely cause is outdated driver software. If you’ve recently updated your device, chances are that the latest firmware update came along with a new driver. These drivers usually contain fixes for bugs discovered during testing, and often include improvements to performance and stability.
In case you don’t know where to find the correct driver, here’s a quick guide. Open Device Manager, select “Network Adapters”, expand the list, locate the wireless adapter, and look for the “Driver Date/Version”. This information is located under the heading “Date & Version Information” near the bottom of the window. You can download the correct driver directly from Microsoft’s site.
Another possible reason for Wi-Fi problems could be that your router isn’t working properly. To check whether this is the case, open the control panel, navigate to “Router Status”, and make sure that everything looks normal. If the status says “Offline”, try restarting your modem and router. Also, double check that your router doesn’t have any physical damage.
Finally, another possibility is that your network configuration is wrong. For example, you might have set up your home network incorrectly. Or maybe you haven’t configured your DNS server correctly. We recommend checking out our tutorial on How to Set Up Your Home Router to learn more about configuring your home network.
If none of these solutions work, you’ll probably have to reinstall Windows. But before doing that, you should backup your data.
Fix Wi-Fi using Network Adapter troubleshooter
To fix WiFi issues after upgrading to Windows 10 Version 22H2, follow the steps mentioned here. If you’re unable to connect to the internet, try checking whether the device is connected to another network or not. Also, make sure that the router is configured properly. If the problem persists, reset the router’s settings. Reset the router’s DNS Server Settings too.
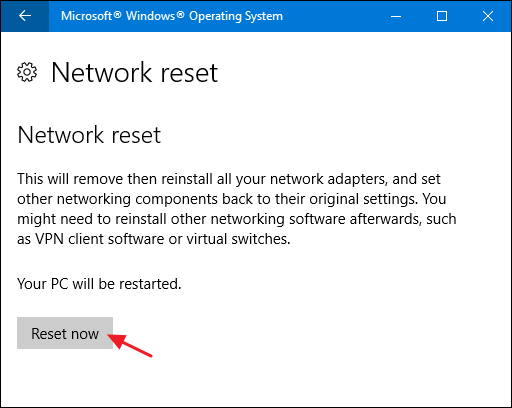
Fix Wi-Fi using network adapter reset
Wi-Fi connectivity issues are common among Windows 10 users. If you’re having trouble connecting to your home network, it could be because there’s something wrong with your network adapter. A quick solution is to reset the adapter. This will fix most connectivity issues.
To do this, follow these steps:
1. Right-click your network adapter and select “Properties.”
2. Select the tab labeled “Driver”.
3. Check the box next to “Update Driver Software…” and press OK.
4. Restart your computer.
5. Connect to your router again.
Fix Wi-Fi updating network adapter driver
In order to fix WiFi problems, download and install the latest driver from the manufacturer’s website. If you don’t want to do it manually, check if there are any beta drivers available for the driver. These usually work with newer versions Windows.
In order to update the WiFi adapter driver, you should know which device name corresponds to your WiFi card. Open Device Manager, go to Networks, select the appropriate device and look under Properties. You can download the latest driver version here.
Remove Windows 11 22H2 to restore Wi-Fi.
Windows 10 includes a number of changes, including a new operating system called Windows 11. If you are experiencing issues with your wireless network, it may be because of one of those features. In some cases, it may be possible to roll back to an earlier version of the OS. Here’s how to do it.
If you use a dual boot setup, you will want to make sure that you don’t accidentally delete the partition where Windows 10 resides. You can check whether you have multiple partitions by opening up Disk Management. If there is no option to change the size of your disk, then you probably just have one partition.
You can find out what version of Windows 10 you have installed by typing winver into the command prompt. This will show you the build number of the latest version of Windows 10. For example, my computer says I am running Build 17134.12.
To roll back to an older version of Windows, open the Start menu and type cmd into the search box. When the Command Prompt opens, enter the following commands, pressing Enter after each one.
cd \c:\windows\system32
wusa /rollback {number}
exit
1. Use System Restore
To prevent automatic updates, go in to the Group Policy Editor.
Click on Start Menu and type group policy in the search bar.
In the left pane, select turn off all automatic updating options
Restart the computer to apply changes.
Disable automatic updates if you are experiencing slow performance.
Use system restore to fix an issue caused due to an outdated driver or software application.
2. Uninstall the Update
This feature allows you to quickly unistall updates without having to wait for the system to perform a full rollback. If you are experiencing problems with the latest update, it might be best to disable automatic updating altogether. Select Restart now and follow the instructions to complete the reset. If you still experience problems after performing a clean install, try restoring your device from a previous backup.
To learn more about how to keep your computer safe, check out our guide here.
3. Update GPU Drivers
Graphics card drivers are important to keep up to date because they contain critical security patches and bug fixes. If you use a graphics card, it’s recommended to update your driver regularly. In some cases, updating your graphic card drivers might fix issues like black screens or freezing.
AMD and Intel both offer free graphics card drivers online. You can download the latest version of the drivers directly from the manufacturer’s website. For example, AMD offers Radeon Software Crimson Edition 17.7.2 and Intel provides Windows 10 1803 drivers.
If you experience problems while installing the drivers, you can try uninstalling and reinstalling the software. After downloading the drivers, make sure to install them correctly. You should choose the correct operating system, architecture, and graphics card model.
You can check whether your drivers are up to date by opening Device Manager. Look for entries named Display Adapter, Video Controller, or something similar. If there are no entries, then you don’t have the newest version installed.
4. Run the System Scans
If you are experiencing issues with Windows 10, it could be because of malware, spyware, adware, ransomware, trojan horses, rootkits, keyloggers, dialers, worms, viruses, etc. If you want to know how to fix the problem, we recommend running a full system scan with Malwarebytes Free. This free program is easy to use, safe, and effective against most threats. Step #1 – Download and install Malwarebytes Free
Step #2 – Scan your computer with Malwarebytes Free
STEP #3 – Remove detected threats with Malwarebytes Free (optional)
**Note: Don’t forget to backup your files before performing any scans. Backups help prevent data loss due to accidental deletion or corruption.**
Malwarebytes Free is a powerful anti-malware utility designed to protect your privacy and security online. With just one quick scan, you can detect and delete malicious software such as viruses, Trojans, spyware, rootkits, dialers, rogues, worms, adware, keyloggers, and many others.
The Malwarebytes’ Anti-Malware Premium version offers even more features, like real-time protection, automatic updates, cloud-based detection, and much more.
Updated: July 2025
We highly recommend that you use this tool for your error. Furthermore, this tool detects and removes common computer errors, protects you from loss of files, malware, and hardware failures, and optimizes your device for maximum performance. This software will help you fix your PC problems and prevent others from happening again:
- Step 1 : Install PC Repair & Optimizer Tool (Windows 11, 10, 8, 7, XP, Vista).
- Step 2 : Click Start Scan to find out what issues are causing PC problems.
- Step 3 : Click on Repair All to correct all issues.

5. Disable Windows Search Indexer
Microsoft has released a patch to address a vulnerability in its Windows operating systems. The bug affects all versions of Windows 10, including Home editions and Enterprise editions. Microsoft says it is aware of no attacks being carried out against customers running Windows 10 devices. However, the company warns that attackers could exploit the flaw to gain access to affected computers.
The security update addresses a vulnerability in how Windows handles indexing files on a computer. This includes documents, images, videos, music, and other items stored on local drives. When indexing files, the Windows Search Indexersvc process uses too much memory. This causes the system to become unresponsive.
To resolve the problem, Microsoft recommends disabling the Windows Search Indexersvchostservice. Locate the Windows Search Indexerssvc service and double-click it to open the Properties dialog box. Click the Startup Type tab and select Disabled. Then click OK twice.
After doing this, restart the computer to ensure the changes take effect. If you are still experiencing issues, you can try reenabling the service again.
6. Perform a Clean Boot
A clean boot will remove all unused drivers or applications that could interfere with Windows 10. This procedure will clear out anything that doesn’t belong on your PC. You’ll lose some data along the way, but you’ll save yourself headaches down the road. To perform a clean boot, follow these steps:
1. Click Start.
2. Type “msconfig.”
3. In the list that appears, select Startup and Recovery.
4. Select Services Tab.
5. Uncheck everything except Automatic Repair Service.
6. Click OK twice.
RECOMMENATION: Click here for help with Windows errors.
Frequently Asked Questions
Is it possible to stop Windows from downloading updates automatically?
Yes! You can use Group Policy Editor to block Windows 10 updates from downloading automatically (GPE). To use this approach, you must be an administrator or a member of the local Administrators group.
Do I Really Need to Upgrade My Operating System?
Yes! Your operating system (OS) is critical to how you use your computer. It keeps track of everything you’ve done on your computer and helps keep your files organized. However, if your operating system is out of the current, it may cause your computer to slow down or crash.