- Download and install the software.
- It will scan your computer for problems.
- The tool will then fix the issues that were found.
BlueStacks is one of the best Android Emulators for Windows OS. If you are looking for an android emulator for pc then BlueStacks is the best choice for you. You don’t need to install any apps in it because it already contains thousands of pre installed apps. So, today we are here with another amazing video where I am showing you How to Root BlueStacks.
If you are interested in rooting BlueStacks then follow the steps given below.
1. First download the latest version of BlueStacks 2020.
2. After downloading open it and login into your account.
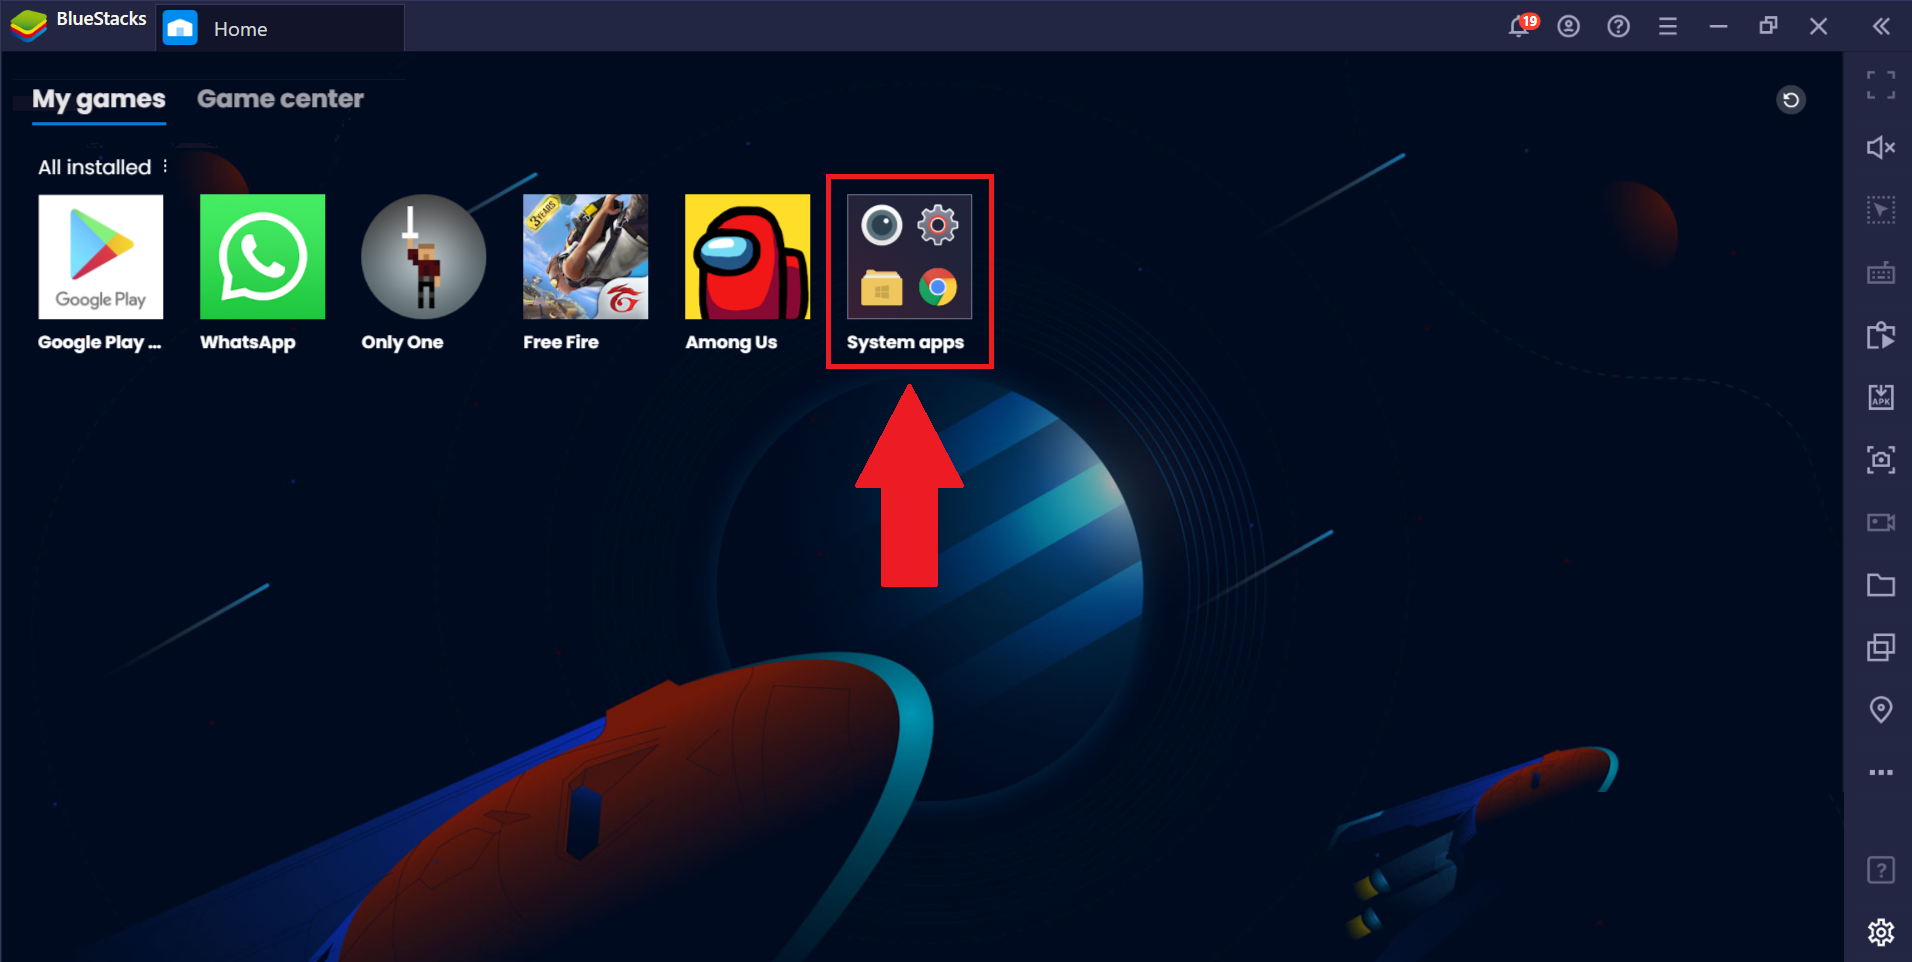
3. Click on it and select “Root” option.
4. When you tap on “Root” button it will ask you for permission to root your device.
What is BlueStacks?
BlueStacks is an android emulation software developed by Rovio Mobile Ltd. It works like an emulator where you can run Android apps on Windows/MacOS computers. This tool lets you run Android apps on your PC or Mac without rooting the device.
Can BlueStacks be used without root access?
BlueStacks is one of the best ways to run Android apps on Windows or macOS computers. If you are looking for something similar to Apple’s iOS emulator, you might want to check out BlueStacks.
You don’t need to install anything else except BlueStacks. You can just download it and start running Android apps on your computer.
However, there are some limitations. For example, you cannot access the phone storage via BlueStacks. Also, you cannot transfer files from your device to BlueStacks. But, if you’re okay with those limitations, you can try BlueStacks.
Here is how to install BlueStacks on your computer:
1. Download BlueStacks from here.
2. Run the downloaded file.
3. Follow the instructions.
4. Enjoy!
Why is BlueStacks required to be rooted?
BlueStacks is one of the most popular Android emulators out there. It lets you run apps that aren’t compatible with your device without having to actually buy it. But what happens when you want to install something else? You might need to root your emulator.
If you’ve never rooted an app before, here are some things you should know about rooting BlueStacks.
What Is Rooting?
Rooting is similar to jailbreaking iOS devices. In both cases, you’re essentially taking control over your device. This usually involves installing third party applications that allow you to perform tasks that Apple doesn’t explicitly approve of. For example, you could use Root Checker to check whether your device is locked down properly. Or you could use Titanium Backup to backup and restore your data.
How Do I Know If My Device Needs To Be Rooted?
There are several ways to tell if your device needs to be rooted. One thing to keep in mind is that every manufacturer has different policies regarding how much access you can give to your device. Some manufacturers lock down phones so tightly that you won’t even be able to change your wallpaper. Others let you go nuts. So make sure you understand exactly what you’re getting into before you start rooting.
The best way to find out if your device needs to root is to simply try it. If you see a warning screen saying that your device isn’t allowed to be rooted, then you know you need to root it. Otherwise, just proceed to step 2.
How to root the newest 2020 version of BlueStacks.
BlueStacks is one of the best virtual machines for Windows PC. It allows us to run Android apps on our desktop computer. However, it does not allow us to install any apps directly from Play Store. In this article, we are going to show how to root BlueStacks latest version 2020. If you want to know about rooting BlueStacks, read the following steps carefully.
Step #1 : Download BlueStacks 5.0.4.3 for Windows 10/8/7/Vista/XP
You can download BlueStacks 5.x.x.x from here. Make sure that you choose the correct version according to your OS.
Step #2 : Extract the files
Extract the downloaded zip file into a folder.
Step #3 : Run the setup
Run the setup file. Follow the instructions given in the installation wizard.
Get a root-checking app from the Google Play Store and install it.
To check if the device is already rooted or not, you can use a simple application calledRoot Checker. This app checks whether the device is already rooted. If you don’t want to install an additional rooting tool, there’s another way to verify the root status of your Android device.
When you successfully root your device you’ll see a message stating that the device is now rooted.
Updated: July 2025
We highly recommend that you use this tool for your error. Furthermore, this tool detects and removes common computer errors, protects you from loss of files, malware, and hardware failures, and optimizes your device for maximum performance. This software will help you fix your PC problems and prevent others from happening again:
- Step 1 : Install PC Repair & Optimizer Tool (Windows 11, 10, 8, 7, XP, Vista).
- Step 2 : Click Start Scan to find out what issues are causing PC problems.
- Step 3 : Click on Repair All to correct all issues.

Method 1: Edit BlueStacks’ configuration file to root it
BlueStacks is one of the most popular Android emulators out there. But did you know that you can easily root BlueStacks without having to install any additional softwares? If yes, then we are here to tell you how to do it. In this tutorial, we’ll show you how to root BlueStacks by editing its configuration file.
To root BlueStacks, just follow the steps mentioned below:-
1. Download the latest version of BlueStacks.
2. Open the downloaded folder.
3. Find the “configuration.txt” file inside the “apps/blue_stacks/” folder.
4. Edit the “configuration.text” file.
5. Save the edited file.
Method 2: One Click Root Applications to root BlueStacks
If you are looking for a way to root Android devices without having to go through complicated steps like flashing ROMs, then we have good news for you. You can now easily root Android phones and tablets using BlueStacks. This app allows you to run Android apps on Windows 10 PCs without needing to use virtualization software such as VirtualBox. In addition to being able to run Android apps on PC, BlueStacks lets you access files stored on your phone and tablet. With this tool, you can even make backups of your device data.
How to Use BlueStacks to Install Root Apps on Your Device
1. Download BlueStacks 3.0.2.3 apk file from our site.
2. Open the downloaded.apk file.
3. Tap on “Install”.
4. Wait for installation process to complete.
5. After installation completes, tap on “Open”.
Method 3: Root BlueStacks using the BS Tweaker application.
BlueStacks is one of the most popular Android emulators out there. Its popularity stems from it being free, easy to use, and having some great features. However, most people don’t know how to root BlueStacks because it requires you to flash the ROM. If you’re looking to root BlueStacks without flashing, we’ve got you covered. We’ll show you how to do it using the BS Tweaker application.
BS Tweaker is a tool that allows you to modify the system partition of BlueStacks. You can change the language settings, enable USB debugging, and even install apps from APK files. Using BS Tweaker, you can easily root BlueStacks without needing to flash anything.
The steps listed here require you to have a rooted device. Before you begin, make sure you have downloaded the latest version of BlueStacks. Once that’s done, open up the app and tap “Settings.” Scroll down to “System Settings,” and select “Device Options.” Tap “Advanced” under “Storage,” and scroll down to “Partition Type.” Select “Primary Partition” and press OK. Now, go back to “Settings,” and tap “Update Apps & Data.” Press “OK” to confirm. Afterward, go back to “Device Options,” and tap “Reboot System.” When prompted, choose Yes.
Now, download BS Tweaker onto your phone or tablet. Open the app, and tap “Install.” Choose “Select File,” navigate to where you saved the file, and tap “Open.” Wait for the installation process to complete. Once finished, tap “Done.” Next, tap “Rooting.” From here, follow the instructions in our guide on how to root BlueStocks.
Once you’ve successfully rooted BlueStacks, you can enjoy all of its awesome features. For starters, you can now run unsigned applications. Also, you can access the Android Market directly from within the emulator. To learn more about what else you can do with BlueStacks, check out our article on it here.
Install the BS Tweaker Application
Open the BS Tweaker application and select Install from the File menu.
Select Yes to confirm you want to install the app.
Click OK to begin installation.
When prompted, sign into your Microsoft account.
Once installed, open the BS Tweaker application.
If you are asked to restart your computer, do so now.
Download and install Root Checker Pro
Click on the install button in root checker pro application.
Wait until the root checker prog icon appears in blue stacks.
Using the BS Tweaker application, root BlueStacks
This tutorial will show you how to root BlueStacks 3.0.2.1. You can use this method to install custom ROMs, such as CyanogenMod, Paranoid Android, Resurrection Remix, etc. This guide works on both Windows and Mac computers.
Step 1 – Download the latest version of BlueStacks 3.x.x.x from here.
Step 2 – Extract the downloaded zip file and run it.
Step 3 – Click on “Install”.
Step 4 – When installation completes, launch the app.
Step 6 – Tap on “Downloaded” tab.
Update and install the SuperSu binary
The Android security team recently discovered a critical vulnerability in many popular apps that could allow attackers to gain root access to devices without requiring physical access. This exploit requires no special hardware or software modifications; it simply exploits a flaw in how some apps handle certain permissions. If exploited successfully, the attacker could install malicious applications, modify system settings, read data from internal storage, or even take over control of the device completely.
To protect against this attack, we recommend you always use the latest version of the app installed on your phone. For those who are running older versions of the app, the good news is that there is now an easy way to fix this issue. We’ve developed a tool called SuperSU, which allows you to easily install the latest version of the Superuser application directly onto your device.
If you already have the SuperSU binary installed, you don’t need to do anything else. But if you haven’t, follow these steps to download and install the latest version of SuperSU:
1. Download the file “SuperSU_v2.55.zip” from our GitHub repository.
2. Extract the zip archive into the folder where you keep your apps.
3. Open the newly extracted folder and double-click on the SuperSU icon.
4. Tap on the “Update All” button to install the latest version of superuser.apk.
BlueStacks’ rooting can be confirmed using the Root Check Pro.
BlueStacks is one of the most popular Android emulators out there. However, it is still unknown whether you can root your device without having to use another emulator like Genymotion. If you are looking for ways to root your phone, you might want to try this method.
This method uses the Root Check Pro app. You just need to download the app and run it on your computer. Then, follow the instructions carefully. Once done, you will see a rooting status.
You can now proceed to install apps and modify settings as usual. Enjoy your rooted smartphone!
Utilize the most recent APK to update SuperSU.
To update the SuperSU app, you must use the latest version of the application. You can download the latest version of the app from the above link. After downloading the APK file, save it on your device.
Double-click on the SuperSu icon to open the program.
In the list of installed applications, select the one called “SuperSU”.
Select the option “Install”, wait for the installation process to complete and restart your phone.
If the problem persists, contact us via email. We will help you solve it.
Install the Xposed Framework
The Xposed framework gives you several tools to customize your Android device. If you want to add a button to quickly open the camera app, you can do it easily. Or maybe you want to change the way your notification bar looks. With Xposed installed, you can make those changes yourself.
Xposed allows you to install apps and modules without having root access. This makes it possible to download and install mods for Clash Royale. Mods are basically customizations that allow you to play the game differently. For example, you could enable a specific card type.
To benefit from a rooted version of BlueStacks, use the Xposed Installer.
BlueStacks offers Android emulation software that allows you to run apps designed for Android devices without having to actually use those devices. While it’s great for testing out different ROMs, there are some drawbacks to running the app in this manner. One of the biggest issues is that you cannot update the device while it’s running inside of BlueStacks. You can always download the latest version of the emulator directly from the developer’s site, but that requires opening up another application. If you want to take advantage of the latest features, you’ll have to do it via the Xposed Framework.
The Xposed Framework gives you full control over how your phone functions. This includes being able to change permissions, disable unwanted applications, and even give yourself root access. To give yourself root access, you’ll need to install the Xposed Framework onto your device. Follow our step-by-step guide to learn how to install the Xposed framework.
RECOMMENATION: Click here for help with Windows errors.
Frequently Asked Questions
Where are all the BlueStacks 4 data files stored on my computer?
BlueStacks allows you to run Android apps on Windows 10 PCs without having to use a virtual machine. With it, you can install popular games like Clash Royale, Subway Surfers, and many others. But what happens when you unplug your device? Where does the data go?
In BlueStacks 4, there are three locations where the data for your apps can be found:
1. On your computer
2. In the cloud
3. In the VDI file
The path where the vdi files are located depends on the installation locations of BlueStacks. If you’re installing BlueStacks on a different partition than your operating system, the location of the vdi file might change.
There is no way to access the data directly from within BlueStacks. You’ll need to open up File Explorer on your computer to see the data.
How To Root Latest Version Of BlueStacks 2 2017 Version Using BS Helper
BlueStacks is one of the best Android emulators out there. You can use it to run apps like WhatsApp, Facebook Messenger etc. without actually installing those apps on your phone. But you cannot install custom ROMs on BlueStacks unless you are rooted. So today we are here to show you how to root latest version BlueStacks 2 2017 using BS helper.
You might want to watch our video on How to Install TWRP Recovery On Samsung Galaxy S8/S7 Edge
BS Helper is a tool used to flash ROMs directly from PC to device. Once installed, it allows us to flash ROMs even if the device is locked. In case you don’t know what is ROM flashing, let me explain it briefly. A ROM is basically firmware image file that contains everything needed to boot up the device. When a ROM is flashed onto the device, it replaces the existing firmware with that particular ROM.
To make things easier, I am showing you step by step guide to follow while rooting BlueStacks 2 2017. If you face issues while following this method, please comment down below. Let us know about your experience.
1) Download BS Helper from the link given below.
2) Open BS Helper and select “Root BlueStacks”.
3) Click on “Next” button.