- Download and install the software.
- It will scan your computer for problems.
- The tool will then fix the issues that were found.
If you encounter the following error code while trying to install/update some programs in Windows 10, it might mean that there is something wrong with your system. This article will show you how to fix this issue.
Error Code 0x8007000D
0x8007000d is one of the most common errors that we see here. If you receive this error code while updating Windows 10, it usually indicates that there is a problem with your computer. You may experience problems like slow performance, freezing issues, etc.
The good news is that you don’t need to worry about losing data because Microsoft provides tools to help you recover lost files. However, you can use third party tools to scan your hard disk and detect corrupted files.
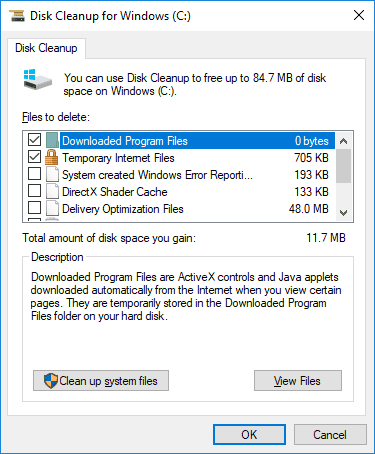
In addition, there are several solutions that you can try to resolve this problem. For example, you can use Disk Cleanup utility to clean up temporary files and free space. Also, you can run System Restore tool to restore previous settings. Moreover, you can reinstall Windows 10 completely.
Causes of Update Error Code 0x8007000d
Update errors are common and usually harmless. However, there are some rare cases where you might see one. This article explains what causes update errors code 0x800700dd and how to fix it.
How to Solve Update Error Code 0x8007000d
There are many ways to fix error code x d, including registry updating, command line options, or even some third party tools. However, most of those methods require you to know what causes the error code 0x8007000D, or how to fix it. So we’ll explain everything here.
Error code 0x80070000 usually indicates that Windows cannot access the specified file because there is no such file or directory. This happens when you try to install a program or run a game. If you see this error message, make sure that you’ve downloaded the correct version of the software and installed it correctly. You can find instructions on how to do this in our article “How to Install Software”.
If you still encounter problems while trying to install software, it could mean that the installer itself is corrupted or damaged. In this case, you must uninstall the application and reinstall it again. To learn how to do this, please refer to our guide “Uninstall Programs”.
If you’re having trouble installing programs, you might want to check whether the files are corrupt or missing. Then select Disk Cleanup under Storage. After doing this, restart your computer.
You can also use the following steps to repair error code 0x80070e00. Please note that this method requires you to have administrative privileges.
1. Open Command Prompt by pressing Win + R keys together. Type cmd into the Run box and press Enter.
2. At the prompt, type cd %windir%\system32 and press Enter.
Run Troubleshooter
Open the troubleshooter via Windows + R keyboard shortcut or the Start menu.
In the window that opens, type “troubleshoot”.
Click “OK”, and you’ll see a list of common problems.
Check if your problem has been fixed. If it hasn’t, run the troubleshooter again.
Updated: July 2025
We highly recommend that you use this tool for your error. Furthermore, this tool detects and removes common computer errors, protects you from loss of files, malware, and hardware failures, and optimizes your device for maximum performance. This software will help you fix your PC problems and prevent others from happening again:
- Step 1 : Install PC Repair & Optimizer Tool (Windows 11, 10, 8, 7, XP, Vista).
- Step 2 : Click Start Scan to find out what issues are causing PC problems.
- Step 3 : Click on Repair All to correct all issues.

In Windows 10
The Windows 10UpdateAssistantshows you how to update your computer to the newest version of Windows 10. This includes downloading the latest version of Windows 10 and installing it on your computer. You don’t even need to turn off your computer manually. If you are asked whether you want to install the latest version of Windows, select Yes.
If you already have Windows installed, the assistant checks for updates to make sure you have the most recent version. If there are updates available, the assistant downloads and installs them automatically.
You can use the Windows 10 Update Assistant whenever you like. However, we recommend starting it once every few months.
This video tutorial explains how to use the Windows 10 UpdateAssistant.
In Windows 11
Microsoft announced Windows 10 S, a version of Windows designed specifically for use on low-power devices like laptops and tablets. While it shares many features with regular versions of Windows, it lacks some key capabilities, including access to apps outside of the Store.
Windows 10 S is available now as part of the Windows Insider Preview program. You can download it here.
For Windows Update Troubleshooter
Windows 10 includes several tools designed to help you fix problems and keep your computer running smoothly. If you encounter issues while installing software or updating your operating system, you can use one of these tools to diagnose and solve common problems. For example, you might want to try the following steps to resolve an error message about “The update cannot be installed because it failed to verify.”
Click on More info.
Under What do I need to run this tool?, select Run anyway.
Click OK.
Wait until the troubleshooting process completes. You can check the status of the repair by clicking View Status.
If there are no errors, restart your computer.
For Compatibility Troubleshooter
If you are having trouble installing the Windows 10 Creators Update, there are some things you can do to help resolve the issue. You can use the troubleshooter tool to check your system for compatibility issues, such as outdated hardware or software components. To access the troubleshooter, follow these steps:
1. Select Check now to start the troubleshooter.
2. When prompted, select Advanced options and then Continue.
3. In the next window, select Hardware info and then Continue.
4. On the following screen, select Device Manager and then Continue.
5. In the Device Manager window, expand Display adapters and scroll down to find your graphics card. Right-click on the device name and choose Properties.
Run SFC
To resolve the 0x80070057 error, you must run the system file checker tool called “System File Checker”. This tool scans all the important files on the hard disk and repairs them automatically. After scanning, you can reboot your computer to make sure that everything works fine again. If you are still facing problems after rebooting, please try the following solutions:
1. Restart your computer in safe mode.
2. Run Disk Cleanup utility.
3. Reset Windows Update settings.
4. Reinstall the latest version of Microsoft Office.
5. Repair your registry.
Run DISM Utility
If you are having problems with Windows 10, it might be due to one or many reasons. One of the most common issues is related to the Disk Management utility. If you encounter errors while trying to use the tool, there are several things you could do to resolve the problem. You can try running the Disk Cleanup utility to delete temporary files and free up space on your hard disk. Or you can run the System File Checker utility to repair corrupted system files. In some cases, you can even reinstall Windows 10 to solve the issue.
This utility scans your entire hard disk for unused files and removes them automatically. Once complete, press OK to restart the PC.
You can also run the System File Check utility to repair corrupted system registry keys. Select Create Recovery Drive option and follow the instructions. After creating the recovery drive, select Next button to begin repairing the system.
Finally, you can perform a clean install of Windows 10. However, you must backup important data before doing so. For detailed steps, please refer to our guide here.
Configure Group Policy Setting
To configure the group policy setting:
1. Open regedit.exe
2. Navigate to HKEY_LOCAL_MACHINE\SOFTWARE\Microsoft\Windows NT\CurrentVersion\Winlogon
3. Create a DWORD value named DisableAutomaticRebootForDomainUsers
4. Set it to 0x00000001
5. Save changes
6. Restart Windows
Use Windows Update Assistant
Windows 10 uses a system called Windows Update to keep your operating system up to date. If something goes wrong during installation, it could cause problems like blue screens of death, freezing, and crashing. To help solve these issues, Microsoft has developed a free tool called Windows Update Assistant.
The program scans your computer and finds out what updates are compatible with your device. You can restart your computer without worrying about losing data or having to reinstall everything.
You can download Windows Update Assistant here.
Edit Registry
Windows Update uses the Windows Registry to store information about installed software and hardware components. This includes the settings required to download and install updates. If you are having issues installing updates, it might be because something is preventing Windows Update from accessing the correct values in the Registry. In some cases, editing the registry can resolve the issue.
1. Open the Start menu.
2. Type regedit into the Search box. Press Enter.
3. Locate HKEY_LOCAL_MACHINE\SOFTWARE\Microsoft\Windows\CurrentVersion\WindowsUpdate\Auto Download. Name the new value Data to 1. Double-click Data to set the value to 1.
4. Close Registry Editor. Restart your computer.
5. Check for Updates again. You should now see the latest update listed under Available For Download. Install the update.
6. Reboot your computer once the installation completes.
Manually download and install updates
Microsoft provides an easy way to automatically download and install Windows Updates, but there are some things you should know about doing it manually.
You can use the Windows Update command-line tool to download and install patches from the Windows Server Update Services (WSUS). You can do this by running wuauclt.exe /updatenow. If you want to check whether a particular patch needs updating, you can use the following command: wuauclt /checkforupdate. To see what patches are available, you can use the /list option.
The next step is to run the update package. When you run the update package, you must specify the path where you want the files downloaded. For example, if you want to download the KB2919355 update, you could type the following:
wuauclt /downloadc:\windows\system32\KB2919355_RTM.msp /quiet
If you don’t specify the full path, the update package won’t work properly.
After you run the update package successfully, you should make sure that all the required components are installed correctly. In addition, you might want to restart your computer.
Reset Windows Update Components Manually
If you are running Windows 10 version 1903, you might want to reset the components manually. There are some reasons why it could happen. If you are experiencing issues like slow performance, freezing, crashes, etc., then you might want to perform a system restore. You can do it easily by following the steps given below.
Step 2 – Select Create a media or USB flash drive.
Step 3 – Click Next.
Step 4 – Choose either Create a bootable disk or Create a disk image.
Step 5 – Click next.
Step 6 – Select Use an existing windows installation disc or ISO file.
RECOMMENATION: Click here for help with Windows errors.
Frequently Asked Questions
Find Lost or Deleted Files on Windows 10 or 11?
Have you deleted files on your Windows 10 or Windows 11 computer that can’t be recovered? Lose some important files unexpectedly? You should really want to get them back. MiniTool Power Data Recovery is a free file recovery tool that you can use to do this.
This data recovery software can help you get back any kind of data from your hard drive, SSD, external hard drive, USB flash drive, SD card, memory card, pen drive, and more. All versions of Windows, including Windows 11, Windows 10, Windows 8/8.1, and Windows 7, can run this software.
You can scan the drive you want to recover data from with the trial version to see if this software can find the files you need.
How to Find Out Which Version of Windows You Have?
You can press Window + R, type winver into the Run box, and press Enter. Then, you’ll see the About Windows screen, where you can see your Windows version and the number of your OS build.