- Download and install the software.
- It will scan your computer for problems.
- The tool will then fix the issues that were found.
Windows 10 includes automatic updates that are designed to keep your computer up to date with security patches and bug fixes. However, sometimes those updates fail.
The error code 0x8007001A occurs when Windows cannot download some updates. You might receive this error while downloading updates for Microsoft Office programs, Adobe Reader, Java Runtime Environment, Internet Explorer, Windows Media Player, Windows Defender, and others.
If you are unable to install the update due to this error, follow the steps below to resolve it.
#1. Restart Your Computer
Restarting your computer will usually clear out temporary files and restart the process. After you reboot, check whether the update is installed successfully.
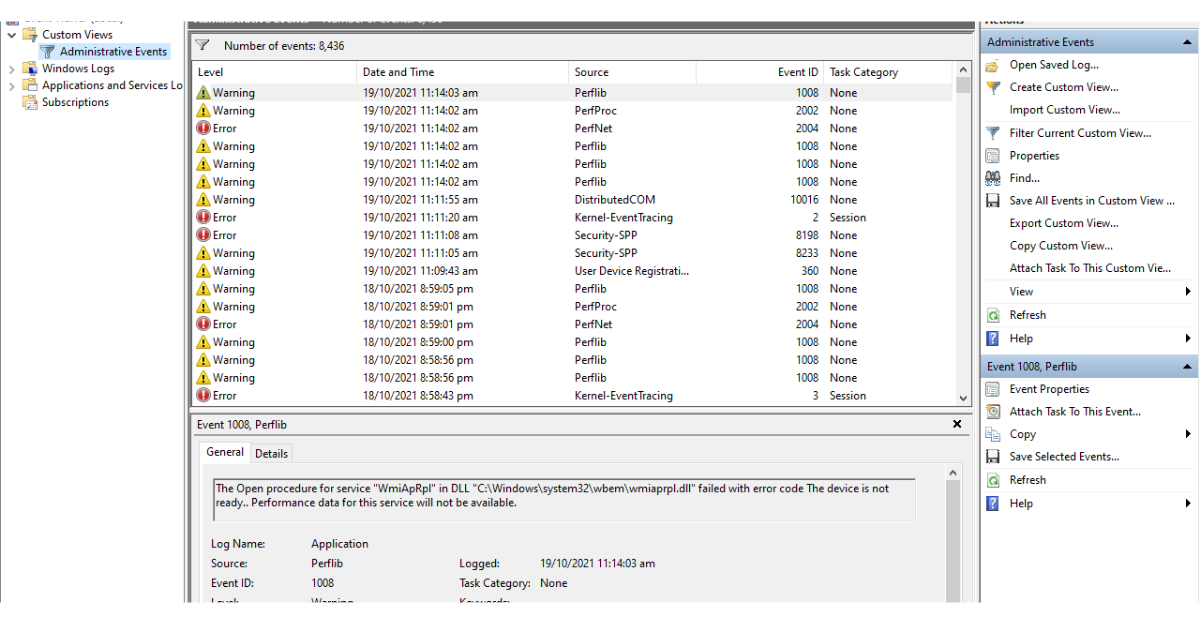
#2. Check For Errors In Windows Event Viewer
Check the event log viewer in the Control Panel. If there are errors related to the update, look for them here.
What Causes Error 0x800700c1
Network connection problems, corrupted or missing file systems, improper shutdown, malware infection, and other common causes for error messages
Update installation services failing to start properly, improper installation of software, or incorrect shutdown are all possible reasons for error messages like “Error 0xc”.
Malware infections cause error messages such as “Error 0x800700c0.”
How to Solve Error 0x800700c1
Error code 800700C1 is one of those cryptic errors that doesn’t really tell us much about what went wrong. If it happens frequently, however, we can narrow down our troubleshooting efforts. Here are some common causes of error code 800700C1.
If you’re getting this error while installing Windows 10, try restarting your PC. This usually fixes the problem.
Check your Internet connection. If you’re trying to download something big like a game update, make sure your Internet connection isn’t slow or interrupted.
Try updating your drivers. Sometimes a driver update solves problems with error code 800700C. To do this, open Device Manager and look for yellow exclamation marks next to device icons. Right-click each icon and select Update Driver Software.
Reboot your computer. Restarting your PC clears out temporary files and programs that could cause issues.
Restore your system to a previous state. If you’ve been working on a project recently, you might want to restore your system to a previous version. You can use System Restore to go back to a date prior to the last time you had trouble with your computer.
Use Safe Mode. In Safe Mode, your computer boots into a special mode where certain features aren’t enabled. This lets you test whether a particular program or feature is causing problems.
Windows Update Troubleshooter
There are many ways to launch Microsoft’s Windows Update troubleshooter. Here are some of the most common methods:
1. Type “windowsupdate” into the start menu search box
2. Right-click the taskbar icon for Windows Update and select “Troubleshoot problems”.
3. Click the arrow next to “Update Driver Software”, expand the list, and choose “Show update history”.
4. Select “View installed updates” under “Summary” and scroll down to see what’s been updated recently.
Repair System File Corruption
System file corruption occurs when Windows encounters a problem while trying to read or write data to a file. This error could cause programs to crash or slow down. When you encounter this issue, it might seem like nothing happens. However, there are steps you can take to fix the problem.
Use the System File Checker Tool
The System File Checker tool scans your computer for errors in system files. You can use this tool to scan for corruptions in system files, such as those related to the operating system, hardware, device drivers, and applications. Type sfc /scannow into the command prompt window. Press Enter. If a problem exists, the tool will display the name of the affected file. Click OK to continue scanning.
Deployment Image Servicing & Maintenance Tool
If you cannot access the System File Checker utility, you can download the Deployment Image Servicing and Management tool from Microsoft. Download the tool here. After downloading the tool, extract the contents of the ZIP archive and double-click the.exe file to start the program. Follow the prompts to install the tool. Once installed, launch the tool and follow the instructions.
Reset Windows Update Components
If you are facing problems while updating Windows 10, it might be due to outdated Windows Update components. In such cases, you must perform a reset of Windows Update components. You can do this manually or automatically. If you want to reset Windows Update components manually, follow the steps given here. However, if you want to reset Windows update components automatically, use Wi-Fi connection.
Scan for Malware
Malicious programs are everywhere. They can come in all shapes and sizes – some are designed to steal personal information, while others try to infect computers with dangerous diseases like ransomware. But most of us aren’t experts when it comes to spotting malicious code. And even if we do spot something suspicious, there’s no guarantee we’ll know what to do about it.
That’s why it’s important to regularly scan your computer for malware. If you’re worried about keeping your data secure, here’s everything you need to know about scanning your PC for viruses.
– An antivirus program scans files on your computer looking for known threats.
– Some free antivirus solutions include AVG Free, Avira AntiVir Personal, Bitdefender Total Security Premium, ESET NOD32 Internet Security, Kaspersky Internet Security, Microsoft Windows Defender, Norton 360, Panda Cloud Security, Symantec Norton Security, Trend Micro Smart Protection Network, Webroot SecureAnywhere AntiVirus Plus, ZoneAlarm Free Edition, and Zoner Enterprise.
– Other paid options include McAfee LiveSafe, Sophos Home Premium, and Symantec Endpoint Protection Standard.
Updated: July 2025
We highly recommend that you use this tool for your error. Furthermore, this tool detects and removes common computer errors, protects you from loss of files, malware, and hardware failures, and optimizes your device for maximum performance. This software will help you fix your PC problems and prevent others from happening again:
- Step 1 : Install PC Repair & Optimizer Tool (Windows 11, 10, 8, 7, XP, Vista).
- Step 2 : Click Start Scan to find out what issues are causing PC problems.
- Step 3 : Click on Repair All to correct all issues.

Temporarily Disable Third-Party Antivirus & Firewall
Microsoft recently released a patch for Windows 10 that caused problems for some people. One of those issues is a bug that prevents users from installing Microsoft Security Essentials (MSE), another antivirus solution, because it conflicts with the newest version of Windows Defender. While the fix is simple enough, it does require a little work to make sure everything works properly. If you want to try out the workaround, here are the steps to follow.
To disable Windows Defender temporarily, open Control Panel, select Programs and Features, and click Uninstall a program. Scroll down to find Windows Defender and uncheck it. You can reenable it later by opening Control Panel, selecting Programs and Features, clicking Add/Remove programs, and searching for Windows Defender.
If you don’t want to use MSE, you can just uninstall it yourself. Click Change settings under “Choose how updates are delivered,” and select Download and Install. Select Turn off automatic updating, and click OK. Then go back to the main window, and check for updates again. When you’re finished, you’ll notice there aren’t any updates left. Now you can safely reinstall MSE.
Install Update With Media Creation
To install updates with media creation on Windows 7 or later versions, follow these steps:
1. Go to the Microsoft download website.
2. Click Create Windows 10 installation media. You can find it under the heading Install Updates.
3. Select Upgrade this PC now to begin installing the latest updates.
4. Choose Accept to agree with Microsoft’s license terms.
5. When you finish upgrading, restart your computer.
6. If you want to keep your files and settings, choose Keep my files and apps. Otherwise, choose Reset this PC to return everything to factory defaults.
7. Wait while your computer restarts.
8. After your computer finishes rebooting, open Windows Update again to check for additional updates.
9. Restart your computer one final time to complete the process.
10. Enjoy your shiny new operating system!
Perform System Restore
The best way to restore your system is to perform a full backup. You can do this by running Disk Cleanup. Then, select “Back up files and settings.” This will take about 30 minutes. When it finishes, open the folder where you saved the backup file and copy everything into another location. Now, you’ll want to reinstall the operating system. To do this, boot from the installation disk and follow the instructions to install the OS. Once the system is installed, reboot again and use the same steps to restore your data.
If you don’t have access to a CD/DVD burner, you can download a free trial version of Acronis True Image 2018. This software allows you to make backups online. However, it won’t allow you to restore your data. For example, if you accidentally delete a document while saving, you cannot recover it with this program.
You could also try downloading a tool called Recuva. Run this program and select the option to scan for lost files. You might have to restart your computer several times during the process.
Related Questions
Running SFC displays an error about Windows Resource Protection could
not perform the requested operation. This error happens if there’s
something wrong with Windows Module Installers or Windows Resource
Protection. A quick way to check if the problem is caused by
Windows Module Installer or by WRP is to run sfc/scannow.
RECOMMENATION: Click here for help with Windows errors.
Frequently Asked Questions
How do I fix errors caused by Windows Update?
Windows Update Errors are common among PC users. They occur due to several reasons such as outdated drivers, missing files, corrupted registry entries etc. These errors can cause serious damage to your system and it might even lead to data loss. So, how do you fix Windows Update errors? Here we have listed some useful methods to troubleshoot Windows Update errors.
1. Check Your Internet Connection Speed
If you are facing slow internet speed issue while downloading or updating your operating system, try checking your connection speed. You can use different tools like Ping Test, SpeedTest, iPerf, etc. to test your internet connectivity. In case you find that your internet connection is faulty, you can easily resolve this problem by changing your network interface card.
2. Uninstall Software Installed On Your Computer
Unwanted software can sometimes cause Windows Update error messages. Remove all unnecessary programs from your machine. This includes old games, unused applications, toolbars, browser extensions, etc. Also, make sure that you don’t install any third party application without verifying its authenticity.
3. Scan For Malware Infection
Malicious software can often interfere with Windows Update process. Therefore, it is recommended to scan your entire device for malware infections. Use anti-malware software to detect malicious threats present on your computer.
How do I reset the parts of Windows Update?
If you are facing problems while installing applications or software that change the system settings, it could be due to the fact that some of the components of Windows Update are corrupt. If there are no errors during installation, you might want to check whether the components are corrupted. You can use the following method to fix this issue.
To reset the Windows Update components:
1. Open Start menu and type “Windows update”.
2. Click on Settings option.
3. 4. In the window that opens up, select View installed updates.
5. Uncheck the boxes next to the items that you don’t want to download.