- Download and install the software.
- It will scan your computer for problems.
- The tool will then fix the issues that were found.
To avoid an unwanted update, it’s best to pause updates for a limited amount of time. This way, you don’t accidentally install a feature that isn’t ready for prime time. If you want to stop automatic updates completely, there are several ways to do so. Here’s how to turn off Windows Update entirely.
Windows 10: How to Turn Off Automatic Updating
If you’re running Windows 10 Pro, Enterprise, Education, or Mobile, you probably know about the option to turn off automatic updating. But what if you just want to temporarily pause updates? Or you don’t want to mess around with group policies, and prefer to take advantage of the built-in options? In either case, here’s how to pause updates.
1. Click on Change settings.
2. Scroll down to “Automatic updates.”
3. Choose When recommended updates are installed from now on.
1. How to stop Windows 111 from automatically updating through the Settings
The Windows operating system automatically checks for updates every day. If you want to stop it from doing that, here are some easy ways to do it.
Step 1: Open the Control Panel. Step 2: Click on Change settings.
Step 3: Select Automatically check for update now.
Step 4: Choose how long you want to wait before checking for updates. For example, select one week.
Once you’ve paused the updates, you can always start them again later. Just open the same window, click on Change settings, and select Start updating immediately.
2. How to Stop Windows Updates by Setting Up a Metered Connection
If you don’t want to update Windows 10 every month, you’ll need to disable automatic updates. This guide explains how to do it.
Windows 10 includes a feature called Automatic Update that helps keep the operating system up to date. However, it doesn’t always work well. For example, Microsoft recently announced that some customers are experiencing problems with the feature, including issues where it fails to download updates. If you’re having trouble with Automatic Update, here’s what you need to know about setting up a metered connection to stop Windows updates.
1. Open Settings.
2. Select “Set up a metered connection.”
3. Follow the instructions to connect to a metered network.
4. When prompted, enter your Wi-Fi password and select OK.
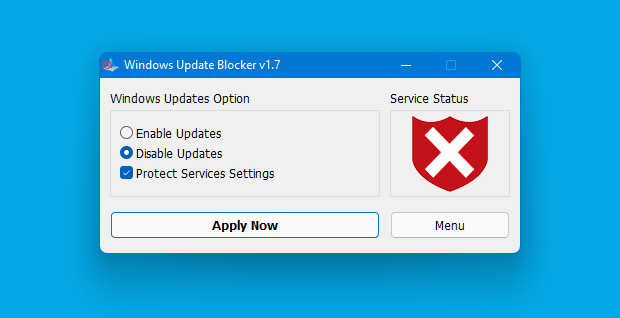
3. How to Use the Windows Update Blocker Tool to Stop Automatic Updates for Windows 11
This will prevent you from receiving future updates automatically. You’ll still receive security updates manually via Windows Update Manager. However, it won’t allow you to install new software or update drivers. If you want to keep updating, just re-enable Windows Update again.
Now that you’ve disabled automatic updates, let’s take a look at how to block certain programs from installing updates. We’re going to use the Windows Update Blocker tool. Start the program and select “Block updates for selected applications.” Then scroll down and find the application you’d like to block. In our example we are blocking Microsoft Office 2016. Once you’ve blocked the program, click OK and restart your computer. When you log back in, you’ll see that the application is no longer listed under “Turn Windows features on or off.”
If you don’t want to disable Windows Updates completely, you can always do what I did and enable the option to check for updates every day. Just remember, there’s nothing wrong with checking for updates daily. It’s simply a matter of preference.
4. How to use Update Services to turn off automatic Windows 11 updates
Windows 10 is one of the most secure operating systems out there. However, it still gets updated regularly. If you’re running Windows 7 or 8/8.1, you might be interested in disabling automatic Windows updates.
This tutorial will show you how to do just that.
Step 1: Open “Services.”
You’ll see a list of installed services. Scroll down to find “Update Services,” and double-click it.
Step 2: Click “Properties.”
Click the Startup tab. Find the checkbox next to “Automatic Updates.” Uncheck it.
Updated: July 2025
We highly recommend that you use this tool for your error. Furthermore, this tool detects and removes common computer errors, protects you from loss of files, malware, and hardware failures, and optimizes your device for maximum performance. This software will help you fix your PC problems and prevent others from happening again:
- Step 1 : Install PC Repair & Optimizer Tool (Windows 11, 10, 8, 7, XP, Vista).
- Step 2 : Click Start Scan to find out what issues are causing PC problems.
- Step 3 : Click on Repair All to correct all issues.

5. How to use Group Policy Editor to turn off Windows 11’s automatic updates
To disable automatic updates through GroupPolicy Editor, you must know how to locate the setting. There, you’ll see a list of settings under Allow Automatic Installation. If you want to turn off automatic updates completely, uncheck the box next to the option named Turn Off Automatic Updates.
If you don’t remember what Group Policy Editor looks like, here’s a screenshot:
Once you’ve disabled automatic updates, you’ll still receive security alerts, but you won’t be able to install updates unless someone manually approves them.
6.How to use Registry Editor to stop Windows 11 from automatically updating
To stop automatic updates, you need to modify the Windows Registry. This article explains why it’s important to do so, what you need to change, and where to find the information needed to make the changes.
The most common reason people want to disable automatic updates is because they don’t like the idea of having software installed without their consent. However, there are many reasons why you might want to keep automatic updates enabled. For example, some companies require certain operating systems to be updated automatically, such as Microsoft Office 365 and Adobe Creative Cloud. In addition, some security patches are required to be applied immediately, regardless of whether you’ve disabled automatic updates.
If you’re looking to manually update your computer, we recommend downloading the latest version of either Windows 10 or Windows Server 2016 from here. If you’re running Windows 8.1 or earlier versions of Windows, you’ll need to upgrade to Windows 10 or Server 2016 first. Once you have those installed, follow our guide to install the latest version of Windows Update.
Once you have Windows Update installed, open the program and select “View updates.” Click “Check now,” and wait while the program downloads and installs the updates. After the installation completes, restart your PC.
Now that you’ve successfully installed the latest version of Windows, you’ll want to go into your registry editor and delete the following keys:
HKEY_LOCAL_MACHINE\SOFTWARE\Microsoft\Windows\CurrentVersion\WindowsUpdate\Auto UpdateEnabled
HKEY_LOCATION_MACHINE\Software\Microsoft\Windows\currentversion\Windowsupdate\Autoupdate
Stop Windows 11 from automatically updating, either temporarily or for good.
Microsoft offers two methods to temporarily stop Windows updates: One allows you to pause updates while the other lets you disable them entirely. You can use either method to make sure you don’t accidentally install a critical update. However, there are some drawbacks to each approach.
The “Pause Update” feature works like this: After you open the Settings app, select “Update & Security,” then choose “Windows Update.” Then, under “Choose how updates are installed,” select “Notify me only about important updates.” Click “OK” to continue. When prompted, enter your password to confirm. Next, scroll down and check the box next to “Do Not Install Optional Updates.” Finally, click “Pause updates.” This will prevent future updates from installing automatically. If you want to resume updating later, repeat steps 2-4.
You can also manually download and install older versions of Windows 10. To do so, go to the Start menu, type “windowsupdate.exe”, and press Enter. Select “Check for updates,” then click “Download updates now.” Browse to where you saved the file, double-click it, and follow the prompts to install the version you want.
If you’re looking to completely disable automatic updates, you’ll need to dig into the registry. Open up regedit, navigate to HKEY_LOCAL_MACHINE\SOFTWARE\Policies\Microsoft\Windows\WindowsUpdate\AU, and set the value DisableAutomaticUpdates to 0.
There are plenty of third party tools out there that let you toggle automatic updates on and off, including the free WindowsUpdateLock utility. In addition to disabling updates, it can also lock certain features such as Wi-Fi hotspot functionality. Another popular tool is the free Automatic Updater Disabler, which does the same thing. Both utilities work just fine, but we recommend sticking with the built-in options if possible.
RECOMMENATION: Click here for help with Windows errors.
Frequently Asked Questions
Do I have to put them all in at once?
Yes, you should install all updates at the same time. This is because for each version of Windows, Microsoft has made a new version of Windows Update. Users of Windows 10 can now get the latest update, which fixes important security issues. If you don’t want to wait for the next major version of Windows, you can use the “Check for Updates” option on the Start menu to check for updates yourself.
Is there a way to stop systems from crashing?
There are ways to keep a system from crashing. First, you should always keep a copy of your files. Second, you should make sure that your computer works well. Third, you should protect yourself from viruses and spyware by using software like Microsoft Security Essentials. Lastly, you shouldn’t use third-party apps that could cause your system to crash.