Updated July 2025: Stop error messages and fix your computer problem with this tool. Get it now at this link
The DISM Host Service (HCS) is responsible for managing Windows 10 deployments. This article explains how to diagnose and resolve HCS issues.
If you see high CPU usage while deploying Windows 10, check whether the following conditions exist:
• If you use a Microsoft Deployment Toolkit (MDT), make sure that the MDT server is configured correctly. For example, ensure that the MDT server has enough storage space and RAM.
• Ensure that the deployment target device meets the requirements specified in the deployment plan.
• Check whether the network connection is stable.
• Make sure that the computer name does not contain spaces.
• Verify that the DNS settings do not include wildcards.
How does the Dism Host Servicing Process work?
The service creates multiple copies of himself. If you run Dism 4.0, it creates up to 10 copies of itself on your system. Each copy runs independently and each one does what it needs to do. For example, it starts the Windows Update Service, installs drivers and patches, and reboots the computer. You don’t see anything happening while Dism is running because he’s doing his work behind the scenes.
The service creates temporary files. When Dism starts, it creates a file named “dism_hostservice.tmp.” This file contains information about the process that Dism is starting. In addition, Dism writes log entries into another file called “dism_log.txt.” These log messages are helpful if you want to figure out why Dism is crashing or misbehaving.
Finally, Dism uses lots of memory and hard disk space. To start Dism, it needs to load many components into memory. It loads the kernel driver for the storage devices, including disks, USB drives, and network adapters. Then it loads the device drivers for those devices. Finally, it loads the operating system module for the device drivers. Because it loads so much stuff into memory, it takes up a lot of RAM. And since there’s no limit to how much RAM you can add to your PC, Dism can use a lot of it.
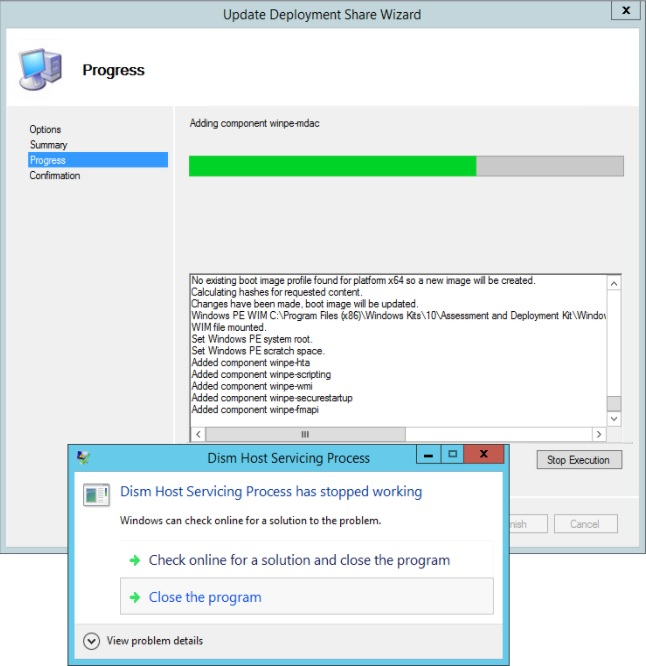
DISM Service Host Process (DismHost.exe) High use of CPU, disk, and memory
Users are experiencing issues with DISM Host Service (DismHost.EXE) taking up too many resources on their computers. This includes high disk activity, memory consumption, and high CPU utilization. This issue occurs because the host service is trying to perform maintenance tasks such as updating drivers, cleaning up temporary files, and uninstalling applications.
There are several things that could potentially cause this issue including Windows Update, Malware/Viruses removal, or outdated operating system. If you find yourself having similar symptoms, follow these simple steps to resolve the issue.
Step #1 – Open Task Manager
and type “Task Manager” into the text box. When it opens, navigate to the Processes Tab. You will see a list of processes running on your computer.
Step #2 – Identify the process causing the issue
Right click on the process and select “End task”. Then check if the issue persists. If the issue does persist, try to locate the process again and end it once more. Repeat step #3 until the issue goes away.
If the issue still persists, you might want to consider performing a clean install of Windows 10.
1] Run SFC Scan
System File Checker scans all important system files on your PC and repairs them if any issue is detected. This tool checks Windows operating systems such as Windows 7/8/10/XP/Vista, Mac OS X 10.6 Snow Leopard and above, Chrome OS and Linux. You can use it to fix errors, optimize system speed, prevent security threats, improve privacy settings, clean junk files, defragment hard drives, uninstall unused programs, delete temporary Internet files, and much more.
2] Disable Superfetch Service
Some users reported that disabling super fast service causes high CPU usage by DismHost.exe. In some cases, it can cause system instability. If you are experiencing this issue, disable superfast service and reboot your computer. This will solve the problem.
You should try this before trying another fix.
3] Do a scan for viruses or malware
When you see high CPU, disk, and memory usage by DismHost.exe it could mean that it is infected with viruses, spyware or adware. To clean your machine, follow these steps:
1] Open Task Manager and end the process named “dismhost.exe”.
2] Then start the following programs one by one and wait till each program finishes completely:
a. Microsoft Security Essentials
b. Windows Defender
c. McAfee VirusScan Enterprise Edition
d. Sophos Anti-Virus Plus
We highly recommend that you use this tool for your error. Furthermore, this tool detects and removes common computer errors, protects you from loss of files, malware, and hardware failures, and optimizes your device for maximum performance. This software will help you fix your PC problems and prevent others from happening again:
Updated: July 2025

4] Use a Repair Source with DISM.
When you install a program on a computer it installs files into several locations including Program Files, Common Files, System32, etc. If you uninstall a program, it removes those same files. Sometimes there are leftover files left behind after uninstalling a program. These leftover files can cause problems such as slow performance, crashes, and errors. To clean up these leftover files, use Disk Cleanup. To find out where a file is located, open the folder window and type the name of the file into the search field. For example, if you want to know where the My Documents folder is located, type “My Docs” into the search field. In some cases, the location of a file may be listed under the heading Other Locations. Clicking on the Other Locations link opens a list of folders that contain the file. Select one of these folders and click OK. This process is repeated until all of the folders containing the file are displayed.
You can also select multiple files and delete them together. Right-click on each file and select Delete. When prompted, confirm that you want to delete the selected items.
If you cannot locate the file, try searching for it using the built-in search function. Type the text you remember seeing into the search box. Press Enter to start the search.
After running Disk Cleanup, close any programs that might still be running. Close Internet Explorer completely. Restart the computer.
5] Cloud Reset PC
The best way to recover data from a damaged computer is to perform a cloud reset. A cloud reset is a procedure that allows you to restore your system settings to factory defaults. You do not need to worry about losing your data because it will be stored remotely. If you have accidentally deleted important files, you can easily retrieve them from the cloud.
To begin with, connect your device to the network. Open the browser and type www.google.com into the address bar. Click on the signup button and enter your email ID and password. Then, select the option “Sign up now”. Once you have signed up successfully, log in to your account. Now, tap on the menu icon in the upper left corner and choose Backup & reset. Afterward, tap on Restore backup.
Wait for the download to finish. When the process completes, reboot your device.
If you still face problems while restoring your data, try performing a hard reset. To do this, press and hold the power button and volume down buttons simultaneously. Keep holding both buttons until you see the Android logo. Release the buttons once you see the Android logo and wait for 5 seconds. Your device will restart automatically.
RECOMMENATION: Click here for help with Windows errors.
Frequently Asked Questions
Is it safe to stop the process of servicing the DISM host?
To stop the service, type dism /online /disablehostserviceing into the command prompt. This will disable the host service. Do not run the DISMServiceHostService if you are unsure about the effects of doing so. If you want to reenable the host service later, use the following syntax: dism /online /enablehostserviceing.
Can I delete DismHost?
If you are looking to delete DismHost, it is highly recommended that you do so via the command prompt rather than manually deleting files. This way, you don’t risk breaking the chain.
You can use the following commands to delete DismHost:
1. 2. Type dism /online /cleanup-image /restorehealth.
3. Press Enter.
4. Wait for the process to complete.
5. Reboot your computer.