Updated July 2025: Stop error messages and fix your computer problem with this tool. Get it now at this link
What is GfxUI.exe?
GfxUI.exe is a Windows application that allows you to control the graphics settings of your motherboard. Because it is part of the operating system, it is always running. If you do not use the integrated graphics card, you probably never see it. However, if you enable it, you might notice some performance issues.
An.exe files are usually executable programs. They are often used to install applications. In general, you should avoid opening unknown.exe files because they could contain harmful viruses or spyware. Double clicking on such files is dangerous. Malicious code can spread itself to other folders and even infect your entire hard disk.
Trojans are malicious software programs that perform actions without your consent. These programs are designed to steal confidential information, change settings, or damage your data. Trojans are commonly disguised as games, music players, videos, or other legitimate programs.
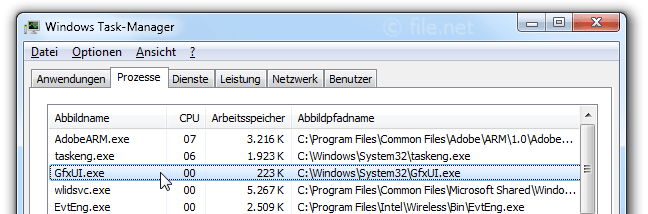
Fix GfxUI.exe Windows 11 and 10 use a lot of CPU.
Task Manager will show 100% cpu usage even though there is no process running. This happens because some programs use it as a background task. If you want to find out what program uses it, open Process Explorer and select “Show processes from all users”. Then go to the tab called “Gfxui exe”, and check whether the process ID is listed under the column named “Process name”. If it is, then go to “Details” and look up the PID value.
There are many ways to fix high CPU usage caused by Gfxui exes. For example, you can uninstall the program. Or you can disable the feature in the program settings. However, sometimes disabling the feature doesn’t work. In such cases, you need to delete the registry key HKEY_CURRENT_USER\Software\Microsoft\Windows NT\CurrentVersion\AppCompatFlags\Layers\Gfxui exe.
If you still cannot solve the problem, try reinstalling the operating system.
1] Restart your computer
If you are having trouble booting into Windows 10, it could be because of a virus infection. If you are experiencing slow performance, unresponsive mouse or keyboard input, system freezes, or other issues while trying to start Windows 10, there are several things you can do to resolve the problem. This article will walk you through some troubleshooting steps to help determine whether you might have a virus infection.
Scan your computer with MalwareBytes AntiMalware
Download and install MalwareBytes AntiMalWare Free Edition. When installing MBAM, make sure to check the box next to “Add Malicious Software Removal Tool”. Click Next.
Once installed, run MBAM and select “Scan Now”. When finished, review the log file located in the same folder where MBAM was downloaded. Look for any suspicious entries.
Remove unnecessary files and programs
Use CCleaner to delete temporary Internet files and cache. Run CCleaner and click on “Tools”, then click on “Delete Cache”. Make sure to clear everything except cookies and history.
2] Reinstall Intel Graphics Driver
Intel recently updated its graphics drivers, and it looks like some people are having trouble getting the latest versions installed correctly. If you’re experiencing problems with your computer, don’t worry — we’ve got you covered. Here are the steps to take to reinstall the Intel Graphics Driver. You’ll want to make sure that you install the latest version of the Intel Graphics Drivers, because older versions might cause issues with the system.
Step 1: Download the Latest Version of the Intel Graphics Driver
Head over to Intel.com and select “Graphics Drivers.” Click on the link labeled “Download Now,” and choose the appropriate version for your operating system. For Windows 10, go to the “Windows Update” section and check for updates on your PC. Once you find the update, click on “Install Updates.”
Step 2: Install the New Intel Graphics Driver
After downloading the newest Intel Graphics Driver, double-click on the file to open up the installer. Follow the prompts to complete installation. Make sure that you close down any programs that you use regularly, such as Microsoft Office, Adobe Creative Suite, etc., before installing the Intel Graphics Driver. Otherwise, you could end up with conflicts during the process.
Step 3: Restart Your Computer
Once you finish installing the Intel Graphics Driver, restart your computer. This step is important, because it ensures that the changes you made to your settings are applied properly. After rebooting, you should see improved performance. If you still experience issues, feel free to contact our support team. We’d be happy to help out.
3] Update or Rollback your Graphics Drivers
The issue you’re having could be caused by a faulty driver. You can check whether it’s the case by updating or rolling back your graphics drivers.
There are many ways to update or roll back your graphics drivers. We’ll show you how to do it manually, and we’ll also show you how to use Driver Easy to automate the process.
4] Scan for viruses and malware
The best way to protect yourself against cyber attacks is to scan your computer for viruses and malware. This is especially important if you are running Windows 10. Microsoft recently announced some changes to how it handles security patches. You might want to read about those changes here.
If you use Chrome, Firefox, Edge, Safari, Internet Explorer, or Opera, you can download Malwarebytes Anti-Malware Free. Once installed, run the program and select “Scan Now”. If there are any threats detected, click the “Quarantine Selected Items” button. Then follow instructions to delete the threat.
For Mac users, you can download VirusTotal free. Run the app and select “Scan Now.” When prompted, enter your email address and password. Click “Log In” and wait while the app scans your system. After scanning completes, you’ll see a list of threats. Click “Download Report” and save the file to your desktop. Open the file and click “Open File”. Follow instructions to install the software.
Once installed, run VirusTotal again. Select “Scan Files & Folders”, then choose the folder where you saved the report. Click “Start Scanning”. A progress bar will show up while the app processes the files. Once finished, you’ll see a screen showing all the threats found. Click the “Details” tab to view information about each one.
You can also use ClamXav. Install the application and open it. Click “New Scan” to start a new scan. Choose the location where you downloaded the virus database and click OK. Next, click “Options” and check the box next to “Enable antivirus database update checks”. Press OK. Finally, press Start.
When the scan finishes, you’ll see a summary screen listing all the threats found. To remove the threat, double-click it. A window will pop up asking whether you really want to remove the threat. Click Yes.
To prevent future infections, make sure you keep your operating systems updated and always apply the latest security patch.
We highly recommend that you use this tool for your error. Furthermore, this tool detects and removes common computer errors, protects you from loss of files, malware, and hardware failures, and optimizes your device for maximum performance. This software will help you fix your PC problems and prevent others from happening again:
Updated: July 2025

Why does Windows 11 use so much of my CPU?
CPU usage is one of those things you might not think about much, but it can really affect how well your computer runs. If you’re seeing unusually high CPU usage, there could be several reasons why. Here are some common causes and ways to fix them.
1. Programs running out of memory
If you’re noticing lots of activity in the background, such as frequent program crashes or slowdowns, it could mean that your system isn’t getting enough RAM. This happens because programs use up RAM while they’re running, even though they aren’t actually doing anything. To prevent this, either make sure you have plenty of free RAM, or move applications to virtual machines.
2. Disk space issues
If you’ve been experiencing slower file access times, it could be due to low disk space. Try moving files off of your hard drive into external storage devices like USB drives or flash drives. If you still experience problems, try deleting temporary files to free up more space.
3. Hardware issues
If you notice unusual behavior, such as random freezes or lockups, it could be caused by hardware failure. Check your motherboard’s BIOS settings to ensure that everything is set correctly. If you find that something needs replacing, consider buying a new PC.
RECOMMENATION: Click here for help with Windows errors.
Frequently Asked Questions
What is Hyper-Threading in Windows 10?
Modern CPUs use a technology called “hyper-threading” to make them more powerful. In fact, it was first used with the Intel Pentium Pro Processor, which came out in 1995. With this technology, multiple threads can run at the same time. So, it makes the processing go faster.
Physical cores are an important part of a processor’s ability to process information. Each core can only do one thing at a time. But if you want to multitask, which means to do more than one thing at once, you need more than one core.
If you don’t have enough cores on your PC, you won’t be able to run software or Windows well. So, the newest technology divides the physical cores of a CPU into virtual cores. This lets the operating system use those cores to process information faster.
Simultaneous Multithreading is the name of this technology (SMT). With SMT, a single core can handle more than one task at once. So, it makes a big difference in how well the system works.
With SMT, you can use two apps at once without closing either of them. You can even open three apps at the same time and still work.
Why is the service host local system using so much CPU?
The most common cause of a “service host local system high disk space utilization” error is an application called Prefetch or SuperFetch. These programs consume too many read and write accesses to the hard disk, especially on SSD drives. They do so without your knowledge, because they run in the background.
As a result, Windows applications that are already installed and running in the background go undetected. They are still active, though, and continue to use up resources. If you find yourself spending hours cleaning up temporary files and deleting old log files, it might be worth checking out the Prefetch and SuperFetch settings. You can change the number of days before items are deleted automatically, or disable both of these programs completely.