- Download and install the software.
- It will scan your computer for problems.
- The tool will then fix the issues that were found.
If you’re running Windows 10, there’s no reason to wait for disaster to strike. You can set up a backup disk yourself today, and make sure everything gets saved just in case something goes wrong.
The best way to protect your files is to keep them backed up regularly. If you’ve got a second hard drive lying around somewhere, now might be a great time to use it.
In addition to backing up your personal documents and photos, it’s important to back up your OS too. This includes things like programs, settings, and drivers. If you’re having trouble getting your PC working again, you won’t want to spend hours trying to figure out why it’s broken. Instead, you’ll be able to restore it quickly and easily.
To start setting up a backup disk, open File Explorer and navigate to the “This PC” folder. Right-click on the “My Computer” icon and select Properties. Click on the Disk Management tab and select Create Volume. Give the volume a name, such as “Backup.” Then choose a location where you’d like to store the disk. Finally, click OK.
Now that you’ve created a disk, you’ll need to install some software on it. For starters, download Acronis True Image 2018. Once installed, launch the program and connect your backup disk. Choose the option to perform a full image backup, and follow the instructions. When the process finishes, disconnect the disk and close the program.
Contents
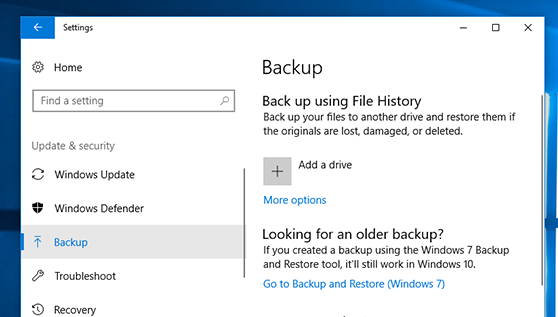
Set up your first backup
If you’ve ever lost data due to a hard disk crash, you know how important it is to keep copies of everything you work on. But backing up your computer isn’t always easy—especially if you’re just getting into the habit. In fact, many people don’t even bother to do it because they think it’ll take too much effort. So what are some simple steps you can take now to ensure that you never lose anything again? Here’s how to set up your first backup.
1. Choose a Backup Location
You might already have a place you like to store your documents and photos. If not, consider one of the following options:
• A cloud storage account such as Dropbox or OneDrive
• A networked external hard drive
• An online backup service such as Backblaze or Carbonite
2. Create a Folder
How to restore a file
If you’ve ever accidentally deleted a file, you know how frustrating it can be to try to find it again. Luckily, there are ways to recover lost data without having to pay hundreds of dollars for professional recovery software. Here’s how to do it yourself.
Step 1: Back Up Your Files
The best way to prevent losing important information is to make sure you’re backing up your files regularly. You don’t necessarily have to use cloud storage like Dropbox or iCloud; just make regular backups to external hard drives, CDs/DVDs, USB flash drives, etc. If you lose access to those devices, you won’t be able to retrieve your files.
Step 2: Delete the File(s)
First, open Finder and navigate to the folder containing the file you’d like to delete. Then press Command + Shift + E to bring up the “Eject” option. Once ejected, drag the file into Trash and empty the trash.
Step 3: Recover the Data
Now that you’ve removed the file from your system, you’ll need to recover it. To begin, connect your device to a Windows PC running Windows 7, 8, 10, or Server 2008 R2. Next, launch DiskInternals Drive Extender and click the “+” button. On Mac OS X, download and install the free version of Carbon Copy Cloner. Now run both programs and follow the prompts to clone your drive.
Updated: December 2024
We highly recommend that you use this tool for your error. Furthermore, this tool detects and removes common computer errors, protects you from loss of files, malware, and hardware failures, and optimizes your device for maximum performance. This software will help you fix your PC problems and prevent others from happening again:
- Step 1 : Install PC Repair & Optimizer Tool (Windows 11, 10, 8, 7, XP, Vista).
- Step 2 : Click Start Scan to find out what issues are causing PC problems.
- Step 3 : Click on Repair All to correct all issues.

Dealing with legacy backups
You’ve just upgraded to Windows 10. You’re excited about the new features like Cortana, fast boot times, and the ability to run multiple apps at once without having to open each app in its own window. But what happens to those old backups? If you backed up your computer to an external hard drive, it’s probably long since been replaced by something newer and shinier. And if you used Time Machine to make regular backups, you’ll want to know how to recover files from your backup images.
In this article we’ll show you how to restore your old backups even though you upgraded to Windows 10. We’ll explain why you can’t simply restore an image or clone your system drive. We’ll also tell you how to move your data from your old PC into your new one.
RECOMMENATION: Click here for help with Windows errors.
Frequently Asked Questions
How long does my PC take to boot up?
The Windows 10 Anniversary Update takes longer to load than previous versions of Windows. This is because there are many changes being made to improve performance, including improvements to graphics drivers, file system, networking protocols, and more. In addition, Windows 10 includes many new features, such as Cortana voice commands, Microsoft Edge browser, and Microsoft Solitaire Collection game. These features require additional processing power.
What happens if I’m already running Windows 7 or 8.1?
You won’t lose anything by updating to Windows 10. Your existing operating systems will continue working just fine. However, you might notice some differences while using Windows 10. Some programs will look different, and some settings may change slightly. To learn how to make the best use of Windows 10, check out our guide to Windows 10.
Will I still receive security patches for Windows 7 and 8.1?
Yes. As part of the Windows 10 release process, Microsoft provides regular security updates for Windows 7 and 8/8.1. These updates include important fixes for known issues and vulnerabilities. They also provide support for Windows Server 2008 R2 SP1, Windows Server 2012 SP1, and Windows Server 2016.
How to install the Windows 10 Anniversary Update
Microsoft officially launched the Windows 10 Anniversary Update on Tuesday, October 17th. If you’re running Windows 7 or 8, you’ll probably receive it automatically over the next few days. But if you’ve been holding out for the free upgrade, here are some tips on how to make sure you get it.
If you’re upgrading from Windows 7, you’ll need to download the ISO file from the Microsoft Download Center. You can find it under “Windows 10.” Once you have the ISO file downloaded, you’ll need to burn it to a DVD.
Next, boot up your computer and insert the disc into your optical drive. When prompted, choose “Install now,” and let the installation begin.
Once the update finishes installing, reboot your PC. You’ll be greeted with a screen asking whether you’d like to restart or continue working. Choose “Restart.”
You’ll be asked to enter your password again, and then you’ll be presented with the Windows 10 desktop.
Now, you can start downloading apps from the Store. To do so, open the Start menu and type “Store.” Clicking the icon that appears should take you directly to the store.
Here, you’ll find a button labeled “Turn Off Suggested Apps.” Click it and select “OK.” This will disable the feature that suggests apps based on what you use most often.
How do I know if my computer has the Anniversary Update installed?
To find out whether or not you have the Anniversary Update installed, open the Start menu and check for any changes between before and after. You’ll notice that the All Apps button used to stand alone at the bottom of the screen. Now, it’s been replaced with an empty space. There are no longer any icons either. This change is what prompted many people to call it “the death of the Start Menu.”
.