Updated July 2025: Stop error messages and fix your computer problem with this tool. Get it now at this link
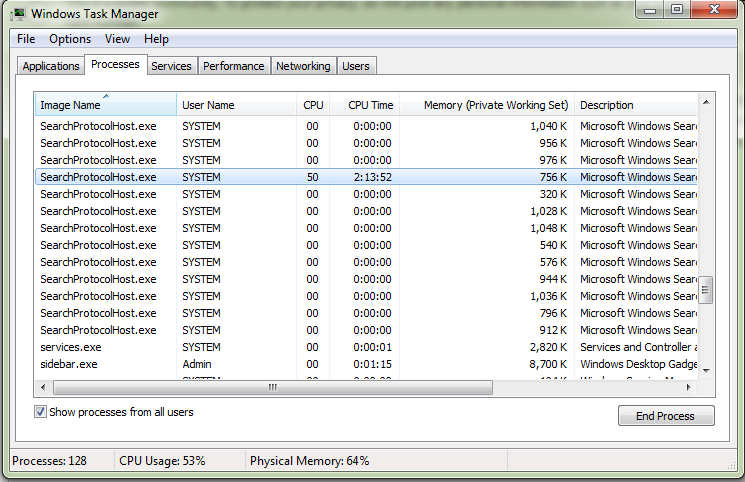
SearchProtocolHost.exe is one of those processes that runs automatically. If it gets stuck, it could cause problems with your computer. You might think that there’s nothing you can do about it, but there are actually several things you can try. Here’s how to fix SearchProtocolHost. exe high cpu usage in windows.
#1 – Disable Your Antivirus Software
If you use antivirus software, make sure it isn’t blocking the program. Otherwise, it won’t work properly. To check whether or not your AV software is interfering with SearchProtocolHost.Exe, go into the settings menu and select “Scanner Options.” Then, disable anything that says “Antivirus,” including the option called “Real-Time Protection.” If you don’t see that option, you’ll have to download another version of the software.
#2 – Update Your System Drivers
Another thing that can cause SearchProtocolHost. Exe to slow down your system is outdated drivers. Make sure that all of your hardware devices are working correctly. If something doesn’t seem right, update your drivers. Go to Device Manager, double-click on each device, and look under the “Driver” tab. Click on the “Update Driver” button next to the driver name. Once you’ve done that, reboot your PC.
#3 – Check For Updates
Windows 10 includes automatic updates, which will keep your operating system updated. However, sometimes these updates can cause issues. If you notice that SearchProtocolHost.XE is taking up a lot of resources, you can manually install updates.
What Is SearchProtocolHost.exe?
SearchProtocolHost.exe is part of Microsoft’s Windows Search Indexing Service. This program runs automatically whenever Windows Search indexer starts. It is responsible for indexing files and folders on local hard drives and network shares. If you find it taking up too much memory, try terminating it. You can do this manually, or use the following command: taskkill /F /IM SearchProtocolHost.EXE.
If that doesn’t help, there are several things you can try next.
1. You can update Windows or undo a recent update.
To roll back recent updates, go to the Start menu and type “Control panel” into the Search bar. This will bring up the control panel. Under the heading Programs, there is a section called Programs and Features. In here, you’ll see a list of programs that are installed on your computer. Scroll down to the bottom of the list and you will see a link titled “Uninstall Updates.” Click on it and follow the instructions.
2. Use the built-in Search and Indexing Troubleshooter.
The built-in troubleshooter helps you identify problems related to indexing issues. If you are having trouble finding information, it might be because there is something wrong with how your site is indexed.
To run the tool, follow these steps:
1. Open the Webmaster Tools menu item
2. 3. Choose the type of problem you’re experiencing and select the appropriate option
4. Review the list of potential causes and fix any errors
5. Once you’ve fixed any issues, go ahead and reindex your site. You’ll see improvements immediately.
3. Remove Recently Installed Third-Party Apps
If you recently installed a third-party app, it might cause problems later. Here are some tips on how to make sure those apps don’t mess up your phone.
1. This will show you apps that have been updated recently. If there are any apps listed here that you no longer use, tap Uninstall Update. You’ll see a list of apps that have been removed. Tap OK to confirm.
2. Go to the Play Store and download the app again. When prompted, choose Install App From Unknown Sources.
3. Once the app installs, open it. If it does, tap Clear Cache & Data. Now try installing the app again.
4. If you’re having trouble getting rid of the app, try deleting it manually. On Android 8.0 Oreo or earlier, swipe down from the top of the screen and select “App info”. Find the app in question and press Menu Key + Backspace. Then press Delete.
5. If you’ve tried everything else and the problem persists, contact support.
6. If you’re running Android 9 Pie or newer, you can delete unwanted apps directly from the Recents menu. Swipe left from the home screen to access the Recents menu. Tap All Apps to view all apps. Scroll down to find the app you want to delete. Press the three dots icon next to it and select Delete App.
4. Run an SFC Scan
The System File Checker (SFC) scans your PC for problems such as missing or corrupt system files. If it finds one, you’ll see a notification about what needs to be done. You can run the scan manually or schedule it to happen automatically whenever your PC starts up.
We highly recommend that you use this tool for your error. Furthermore, this tool detects and removes common computer errors, protects you from loss of files, malware, and hardware failures, and optimizes your device for maximum performance. This software will help you fix your PC problems and prevent others from happening again:
Updated: July 2025

5. Defragment Your Disk
Defragmentation is one of those things that you probably don’t think about too often, but it really does make a difference. If you’re running low on disk space, you might want to consider scheduling a defragmentation session. This process will move files around on your hard drive, making room for new ones.
In addition to freeing up space, defragmentation can speed up your system by moving frequently accessed files into memory faster. In fact, some people say that defragmentation is like having a second hard drive.
You can schedule defragmentation manually, via Windows Task Scheduler, or automatically, via third-party software such as CCleaner.
6. Change Indexing Options
The search engine indexes every file and folder on your computer. This can cause problems when it takes too long to render the results. You can speed up the process by excluding certain folders or files from being indexed.
There are three options under the Indexing section: Exclude Files/Folders, Include Files/Folders and Use Custom Rules.
Excluding specific files or folders from indexing can help improve performance. If you want to exclude a particular folder, select the option called Exclude Files/Folds and enter the path to the folder. For example, if you wanted to exclude the “Downloads” folder, you would type /Users/username/Downloads into the field.
You can also use custom rules to specify what types of files and folders should be excluded. Click Create New Rule and add one rule per line. Each rule consists of a regular expression followed by a list of exclusions. For instance, if you wanted to include.jpg images but exclude.png files, you could write something like /\.(jpe?)g$/.
When you’re done adding rules, click Save Changes.
If you still experience slow loading times, try disabling image previews. This setting appears under the same menu item. Select the box next to Disable Image Preview and hit Apply.
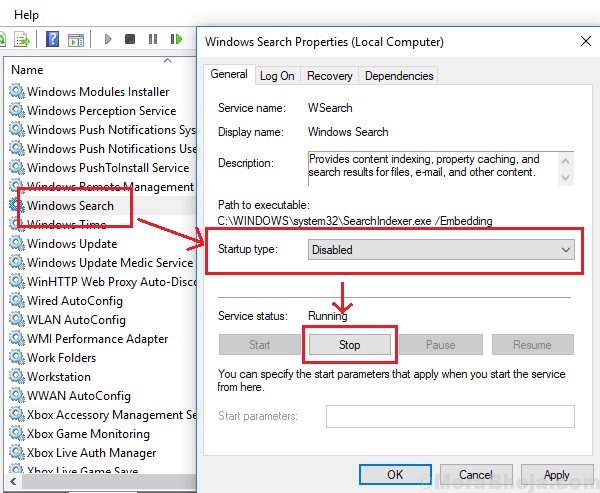
7. Disable Windows Search
Windows 10 introduced a feature called “Search,” which allows users to quickly find apps, documents, music, videos, and photos across their devices. This feature is very useful, especially for those who use multiple devices regularly. However, it does come with some drawbacks. For example, if you disable Windows Search, you won’t be able to search through files or folders on your computer. Also, disabling Windows Search might slow down your PC slightly.
To turn off Windows Search, follow these steps:
1. 2. Click the toggle switch next to “Turn On Windows Search.”
3. If you’d like to re-enable Windows Search later, repeat Steps 2 and 3.
4. To see what else you can do with Windows Search, check out our guide here.
SearchProtocolHost.exe High CPU Usage Fixed
If you are experiencing high CPU usage while running Windows 10, you might want to check out SearchProtocolHost.exe. This process uses a lot of resources when it runs too long, and this often causes slowdowns, crashes, and freezes. In some cases, SearchProtocolHost.exefixed the problem, but in many cases, there wasn’t anything wrong with the program. If you still experience performance issues, try updating your drivers.
Scroll down to the bottom and look for “Intel(R) Core(TM) i7-4500U Processor.” Right-click on Intel(R) Core(tm) i7-4550U Processor and select Update Driver Software. Click Next and follow the instructions. You might also want to make sure that you have enough RAM installed.
RECOMMENATION: Click here for help with Windows errors.
Frequently Asked Questions
How to find corrupt System Files and fix them?
The SFC utility is a built-in tool included with Windows operating systems that scans for corruptions in the Windows system files and catalogs. If you are experiencing problems while trying to start your computer, try running the SFC utility to see whether there are any issues with the Windows system files. You can download the SFC utility here.
To run the SFC utility, open Command Prompt or PowerShell as administrator and type the following commands one by one:
– Type “scannow”. This command starts the scanning process.
– During the scanning process, you might receive some messages about invalid registry keys. Ignore those messages because they are normal.
– Once the scanning is completed, close Command Prompt or PowerShell.
– It may still take 20-30 minutes for the SFC utility to finish fixing the corrupted system files.
If the SFC utility finds corrupted system files, you will be asked to replace the corrupted files with the original ones. Click Yes to continue. After replacing the corrupted files, restart your computer.
Is there anything bad that could happen if I rebuild the Windows Search Index?
The main drawback of rebuilding the Microsoft Windows search index is that this is a time-consuming operation. Depending on the size of the disk space you are working with, the amount of data stored on your system, and the number of files and folders in those directories, it could take days or even weeks to finish the task. During this period, the search results displayed by Windows 10 will be incomplete.
You can expect high CPU usage while the rebuild is taking place. If you have multiple disks and partitions, you might want to consider creating a separate partition just for Windows search indexes. This way, you won’t have to wait for the rebuild to complete every time you install a new operating system.