- Download and install the software.
- It will scan your computer for problems.
- The tool will then fix the issues that were found.
Error code 0xC1420121 occurs due to a corrupt software package. In most cases, it happens because of a virus infection. However, there are several reasons why you may encounter this error code. If you see this error while trying to install Windows updates, here are some solutions that you can try.
1. Run a system scan. First, download a free utility called System Mechanic Pro. Open the program and select the option Scan Now. Next, click Start. Then, let the computer do its thing. When the scanning process completes, you’ll receive a report detailing what needs to be fixed.
2. Repair the registry. To find out how to repair the registry, follow these steps:
a. b. Locate HKEY_LOCAL_MACHINE\Software\Microsoft\Windows\CurrentVersion\Installer.
c. Name the value FixUpdateProblem, enter “0”, and set the data type to REG_DWORD.
d. Set the value to 1.
What Leads to Windows Update Error Code 0xc1420121?
0xc1420121 – What does it mean?
A common problem that people run into while installing Windows Updates is getting an error code like 0xc1420121. If you see this error code, there could be multiple reasons why it happens. Here are some of the most likely ones.
1. A corrupted file
If you’re having trouble downloading Windows 10 updates, it might be because one of the files that you download gets damaged somehow. You’ll notice this if you look at the bottom of your screen where you see “0xC1420121”.
2. Network issues
This error code often occurs when you’re trying to connect to the Internet via Wi-Fi or Ethernet cable. If you’re experiencing problems with your connection, check your router settings. Also, make sure that you have enough bandwidth left on your computer.
How Can Windows Update Error Code 0xc1420121 Be Fixed?
Microsoft recently announced it had fixed a bug in Windows Update that caused error code 0xc1420121. This issue affected computers running Windows 7, 8, 10, Server 2008 R2, 2012, 2016, and 2003. Microsoft says the update is now rolling out worldwide and should be complete within 24 hours.
If you are still seeing the error, try restarting the Windows Update Service. You can do this by opening the Services applet in Control Panel, selecting the Windows Update service, clicking Start, and then pressing Ctrl+Shift+Esc. Alternatively, you could reboot your computer. To check whether your computer is infected with malware, download Malwarebytes Anti-Malware Free and run a scan.
Windows Update Error 0xc1420121 Fix
Windows 10 Anniversary Update will bring much better performance and stability than previous versions. However, there are some issues like missing drivers and system errors that might occur during installation. If you encounter such problems while installing the update, you can fix them easily without having to reinstall your OS.
Here we present a solution to Windows Update error 0xc1420121. This error occurs due to corrupted registry files and corrupt system files. You can fix this issue by following simple steps.
Step 1: Download the latest version of WinRAR software.
Step 2: Extract the downloaded file to extract the contents.
Step 3: Open the extracted folder and locate the folder named “Win7_x86”.
Step 4: Copy the entire folder to another location. For example, copy the folder to desktop.
Step 5: Now open the command prompt window and type the following commands one by one:
cd C:\Users\Your User Name\Desktop
cd \Win7_x86
rar x -rvf Win7_x86.zip
Step 6: After extracting the zip file, run the setup program.
Step 7: Follow the on-screen instructions to complete the installation process.
Step 8: Restart the computer for changes
Method 1. Manually restart the Windows Update Service
To solve the problem, you must restart the Windows Update Service manually. Here’s how to do it:
1. Open the Start menu and type “services.msc”. Press Enter.
2. Locate the “Windows Update” service under the Services category. Right-click it and select “Start.”
3. When prompted, enter the password for the local administrator account. Click OK.
4. Wait while the computer restarts the Windows Update Service. Once completed, the error message should no longer appear.
5. If the problem persists, try Method 2.
6. If both methods fail, try Method 3.
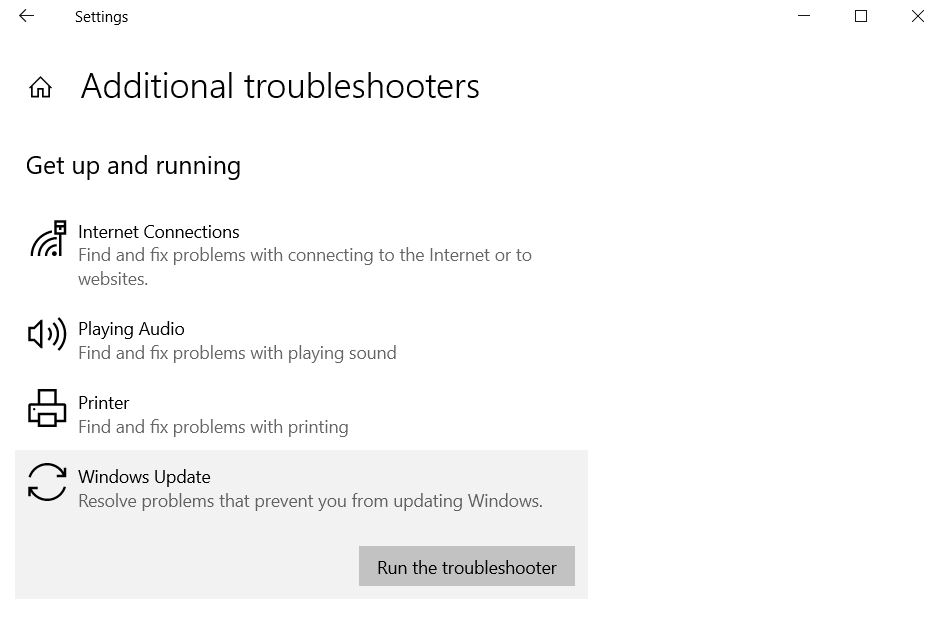
Method 2. Run the Windows Update Troubleshooter
Open the Search bar in your Taskbar or press Windows + T to open it. Type “Control Panel” into the search box. In the upper right corner of the window, type “Troubleshoot”. Click on the link named “Windows Update.”
In the left pane, select “View update history”. If there are no errors listed, continue to step 3. Otherwise, scroll down to see the error messages. You’ll want to fix the problems one by one. For example, if you receive an error about “The update cannot be installed because the required file is missing”, try downloading the missing file manually.
If you’re still having issues, try running the Windows Update Troubleshooting Tool again. This tool scans your computer for common problems and fixes them automatically. To run the tool, open the Start menu and type “troubleshoot”. Alternatively, you can download the tool here.
You might need to restart your PC to complete the process. When you’re finished, close the windows and check out our guide for how to use Windows 10.
Updated: July 2025
We highly recommend that you use this tool for your error. Furthermore, this tool detects and removes common computer errors, protects you from loss of files, malware, and hardware failures, and optimizes your device for maximum performance. This software will help you fix your PC problems and prevent others from happening again:
- Step 1 : Install PC Repair & Optimizer Tool (Windows 11, 10, 8, 7, XP, Vista).
- Step 2 : Click Start Scan to find out what issues are causing PC problems.
- Step 3 : Click on Repair All to correct all issues.

Method 3. Remove Remaining Installation Files for Macrium (if Applicable)
Macrium Reflect is a disk imaging tool used to backup and restore computers. It allows you to make copies of your hard drives, partitions, and even entire disks. If you want to use it to create bootable media, you’ll need to install it on a separate partition. Once installed, it creates a virtual machine that runs alongside your operating system. While it does provide some useful features like creating bootable ISO images, it doesn’t offer much else. However, there are times when you might forget to uninstall it completely. In such cases, you can use this guide to delete leftover files left behind by Macrium Reflect.
Step 1: Launch the Start menu and type “cmd”. Press Enter.
Step 2: Type ‘cd’ followed by the path where you installed Macrium Reflect. For example, if you installed it to Program Files, enter the following command: cd \Program\Files\Macrium Reflect.
Step 3: Run the command ‘dir’. A list of folders and files will be displayed. Look for anything starting with ‘MRS.’
Step 4: Delete the file named ‘MRS_Uninstaller.exe’.
Step 5: Restart your computer.
Step 6: Install any software you’d normally do after installing Macrium Reflect.
Method 4. Use the System File Checker (SFC Scan)
To check if there’s an issue with your Windows 10 installation, you can use the SFC Scan tool. This tool scans your computer for errors and issues, such as missing files, corrupt registry entries, invalid shortcuts, etc. You can run the tool manually or schedule it to run automatically.
You can download the SFC Scan tool here. Once downloaded, open the executable file and follow the instructions. After running the tool, wait for the scan to finish. If everything goes well, you won’t see any errors. However, if you find any issues, you’ll receive a pop up notification. Click OK to continue.
If you’re looking for a way to fix the problem, refer to our guide on how to repair corrupted Windows 10 systems.
Method 5. Run the CHKDSK Command
The command prompt window opens up. You are now ready to perform some maintenance tasks. If you do not know what you’re doing, I recommend reading our guide on how to fix common startup problems.
If you want to see the contents of your hard disk, type dir /x and press Enter. This displays the directory structure of your computer. To check the health of your hard disk, use chkdsk.exe. To start the process, type c:\chkdsk /f and press Enter.
To repair damaged files and folders, type chkdsk /r and press Enter. To repair corrupted system files, type chkdks /f and enter.
If you experience errors while running the command prompt, try typing cmd /c instead of just cmd.
Method 6. Deploy the DISM Scan
TypeCMDprompt into the search bar and press Enter. A window will open up and you will see a list of commands. Click OK. You will now see a screen where you can select a disk to scan. Select the disk and click Next. Wait while it scans the disk. When it finishes scanning, click Finish. If there are no errors found during the scan, you will be presented with a summary of what was scanned. Go ahead and click Close.
If you want to do some manual cleanup, go ahead and delete anything that doesn’t belong on your system. For example, if you don’t use Chrome, uninstall it. Also, make sure you don’t have any old Windows applications installed. These things take up space and slow down your computer.
You can also check out our guide on how to clean up your registry.
Method 7. Reset Windows Update Components
Microsoft recommends using Method 5 to reset Windows Update components. However, some people are reporting success with Method 7. Here is how it works:
1. Open the Start menu and type cmd into the Search box.
2. Right-click the command prompt icon and select “Run As Administrator.”
3. Type the following commands one by one.
4. Press Enter twice to confirm each step.
RECOMMENATION: Click here for help with Windows errors.
Frequently Asked Questions
Who Is Responsible for Windows Updates?
Microsoft pays for updates to its own operating systems, such as Windows 7 or Windows 8. However, if you are running a previous version of Windows, such as XP, Vista, or 2003, you will have to pay for them yourself. Microsoft provides free security patches here.
What is the cost of a Windows update?
A regular Windows update costs between $20 and $30. You may find out how much an individual update will cost you by visiting this page.