Repair Windows 11 100% Disk Usage (2022)
There are many reasons why you might want to free up space on your hard disk drive. Maybe it’s because you just installed a new operating system and you don’t know how much space you need to allocate. Or maybe you simply forgot to delete some files and now you’re running out of room. Whatever the reason, there are several ways to resolve the problem.
The easiest solution is to use the built-in tools that come with Windows itself. However, if you’ve been experiencing problems with your computer, you might prefer to try one of the following methods.
How to Free Up Disk Space in Windows 10
If you’re running Windows 10, you probably already know about the Disk Cleanup tool. This utility allows you to clean up temporary files, recycle unused programs and apps, and even uninstall old drivers. To access the tool, open the Start menu and type disk cleanup into the Search bar. You can also use the command prompt to perform similar tasks. For example, you could run the command del /f /q /s c:\*.* to remove everything on your C: drive. If you’d like to learn more about the commands used here, check out our guide on Command Prompt Basics.
How to Free up Disk Space in Windows 8/8.1
Windows 8 introduced a new feature called File History, which lets you store important documents online. Unfortunately, this option isn’t accessible via the regular File Explorer interface. Once you’re there, select Create a backup schedule and follow the instructions to set up automatic backups.
1. Disable SysMain (Superfetch) Service
The SysMain (SuperFetch) service is responsible for keeping track of frequently used files and programs. This helps speed up startup times. However, it consumes quite some amount of RAM and disk space. To disable this service, follow the steps mentioned below.
Step 1: Open the Start menu and type “Services”. You’ll see a list of running services.
Step 2: Find out the name of the service called “SysMain” and select it.
Step 3: A small window will pop up where you can change the settings for the selected service. Select Properties.
Step 4: On the General Tab, uncheck the box next to Enable.
Step 5: Close the properties window.
Step 6: Restart your computer.
2. Connected User Experiences and Telemetry should be turned off.
Windows 10 Creators Update introduced several changes to improve the overall performance of the operating system. One of those changes included the introduction of the “Connected User Experience,” which enables Microsoft to collect data about how you use your PC. However, some people are reporting that disabling this feature reduces the size of their hard drives.
Microsoft says that this change does not affect the amount of storage space used on your computer. Instead, it simply removes unnecessary data collection. For example, it stops collecting information such as what apps you’re running, whether you’re playing games, or even if you’re watching videos.
If you don’t like the idea of turning off this feature, there’s another way to reduce the amount of space consumed by Windows 10. Then, choose OK.
3. Disable Windows Search
Windows 10 includes a feature called Windows Search. If you don’t use it, you might want to disable it.
4. Disable Scheduled Defragmentation
The Disk Defragmenter tool allows you to defragment your hard disk automatically. However, it does so without your knowledge, and it runs every day at midnight. If you want to stop it from running automatically, follow these steps:
1. Open Notepad and enter the following text into the file:
@echo off
net start defrag
exit /b 0
2. Save the file as “DisableDefrag.bat”. Double-click the.bat file to run it.
3. In the dialog box that appears, type Y to confirm that you wish to disable scheduled defragmentation. Press Enter to continue.
5. Disable Startup Apps
Startup apps are programs that run automatically in the background without your awareness. These apps are often used by developers to test out features or perform tasks while you’re working on another project. However, startup apps can cause problems for users because they use up memory, CPU cycles, storage space, and battery life. Some startup apps are necessary to keep your device running smoothly, such as the Android OS itself, but many others aren’t needed. You can disable unnecessary startup apps to free up RAM, disk space, and battery power.
Scroll down to see what apps are listed under “Running.” If you don’t recognize some of the apps, tap the app name to view further information about it. To stop the app, simply tap the red button next to the app name.
6. Disable MSI Mode
The default setting for Windows installation media allows Microsoft to install multiple operating systems on one hard disk. However, it consumes huge amount of disk space. If you want to use SSD as storage device, disable the MSI mode. You can do this by changing the property value of the registry key HKEY_LOCAL_MACHINE\SYSTEM\CurrentControlSet\Control\Session Manager\BootExecuteDisable. To change the property value, follow the steps given here.
Change the property value to “Device Instance Path” from drop down menu
If you don’t know what Device Instance Path is, check out this link.
Change the property value from “Device Instance Path”.
After changing the property value, run the command prompt as administrator and type the following command:
reg add HKLM\SYSTEM\Current Control Set\Control\Session Manager /v BootExecuteDisable /t REG_DWORD /d 0x00000200
You can replace 0x00000200 with any number to set different value. For example, if you want to set the property value to 0x00000001, type the following command: reg add HKLM\SYSOFTWARES\MICROSOFT\WINDOWS\CURRENTVERSION\RELAUNCH\DISABLE /v BOOTEXECUTEENABLEDISABLE /t REG_DWORDFIVE /d 0x00000005
7. Reset Virtual Memory
Resetting virtual memory helps reduce disk space used by programs and frees up some hard drive space. When you run low on physical memory, Windows starts swapping data into the operating system’s paging file, which slows down performance. If you want to reset virtual memory, follow these steps:
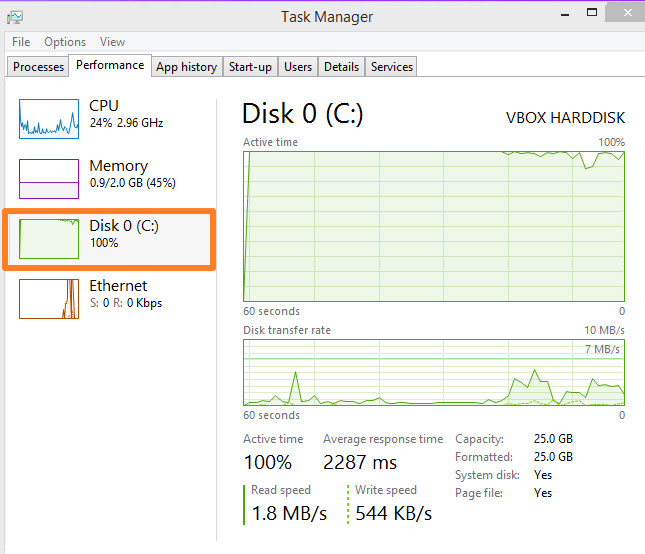
1. Open Task Manager by pressing CTRL+ALT+DELETE.
2. Click on the Processes tab.
3. Right-click on one of the processes listed under Physical Memory and select Properties.
4. Select the Advanced button.
5. In the Startup Type field, choose Automatic.
6. Check the box next to “Change the amount of memory assigned to each process”.
8. Perform a System Scan
A system scan helps you identify any issues which may cause an increase in disk usage. This includes identifying files, folders, registry keys, processes, and even network connections. If there are any problems found during this process, you’ll receive detailed information about what needs to be done to fix them.
1. Download MalwareBytes Free
2. Run it and let it do its thing
3. When finished, press “Save log”. Save the file to your desktop.
4. Open up Notepad and paste the contents into the text box. Click OK to save the log.
5. Copy the entire log and post it in the comments section of this tutorial.
6. Post the link to your log here.
7. Wait for assistance.
9. Disable Background Apps
Windows 10 Pro offers some great features like Cortana, Microsoft Edge browser, etc. But it consumes lots of resources too. If you are facing slow loading speed due to heavy RAM consumption, then disabling background apps might help you out. Here we will show you how to disable background apps on Windows 10 Pro.
1. Click on Change Plan Settings button.
2. Select “Turn off Background Apps”.
3. Now restart your system and see whether it works fine or not.
4. To turn off background apps permanently
10. Run Disk Check
Disk checks are performed automatically on each bootup of your computer. This process runs quickly and does not require intervention. However, it is important to know what happens during a disk check.
A disk check is performed everytime you reboot your PC. If there is no space left on the hard drive, the operating system displays an error message. You must resolve this issue before you can use your PC again.
If the disk check finds errors, you see a warning message about the problems found. Click OK to continue rebooting your PC.
To run a disk check manually, press F8 repeatedly while starting up your PC. When prompted, select “Check Now”.
Frequently Asked Questions
How to Find Out How Much CPU Windows 11 Is Using?
To check how much processing power is being used by each application on your computer, open the Task Manager window and select More Details. You can then sort processes by CPU usage under Processes. If you want to know what process is consuming the most resources, look at the CPU column.
What Is CPU on Windows?
A CPU is an essential part to every modern PC. In fact, it’s one of the most important components in your computer. Without a good CPU, you won’t be able to run your favorite programs. This guide will explain what a CPU actually does, how CPUs work, and why you need to keep up with technology.