Updated July 2025: Stop error messages and fix your computer problem with this tool. Get it now at this link
When DCOM server process launcher launches too many processes, it will cause high CPU usage and memory consumption. This problem happens because DCOM server process launcher starts multiple instances of itself to handle different tasks. So how do we fix it? First, we must understand what causes this issue. Then, we can find ways to prevent it.
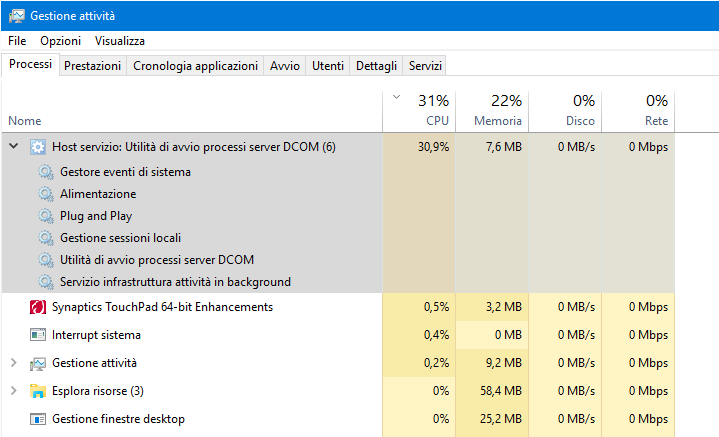
Service Host: High CPU and memory use by DCOM server process launcher
A Microsoft support article describes how to fix the issue where the “service host” processes are taking up too much RAM. This could happen because of malware, spyware, or a poorly written application.
The article suggests disabling the Live Tile service, which loads additional applications into memory. If you’re having problems with the performance of your PC, run the Windows Memory Diagnostic tool. If it finds anything wrong, it will tell you what needs to be fixed. To open the tool, press Win + R, type cmd, and enter memdiag /fixmbr. Then restart your computer.
You can also disable the Windows Defender SmartScreen filter to see if that helps.
1] Set PC to work at Best performance
The following steps are required to set up Windows 10 to work at optimal performance.
Step 1: Click Start button and select Settings.
Step 3: Choose Change what actions trigger performance options and scroll down to find “Set PC to work at Best Performance”.
Step 4: Checkmark it and press OK.
Step 5: Restart your device to see the changes.
2] Set the PC to work at its best.
The Windows operating system boots up every time you turn it on. But what happens when there are issues during the process? If you don’t know how to reboot into the “clean boot” state, here’s how to do it.
Windows 10
When you start your computer, it goes straight to the desktop without showing anything else. This is called the “boot mode.” When you’re done working on your PC, go ahead and shut down your machine. Then restart it again. Before doing that, press the power button on your keyboard to enter the BIOS setup screen. In the BIOS menu, look for the option labeled “Boot Mode,” and select the one named “Clean Start.”
Windows 7 & 8
Go to the Control Panel and open System Properties. Click Advanced System Settings under Startup and Recovery Options. Select the tab titled Restart. Choose the option labeled “Press F8 repeatedly to enter Setup.” Press Enter to continue. Once you see the main setup screen, scroll down to the bottom and choose “Restore Factory Defaults.”
Mac OS X
Type in the following command: sudo nvram -d boot-devicecdrw,removable
3] Run the Memory Diagnostic Tool for Windows.
The Windows Memory Diagnostic Tool is a free utility that helps identify problems with your computer’s memory. This tool runs on all versions of Windows operating systems. To run the tool, launch it by typing “winmmd.exe” into the Start menu Search box. You can use the tool to diagnose issues such as low RAM, slow performance, virus infections, hardware failures, power supply problems, etc. If you are experiencing any problems with your computer‘s memory, try running the tool.
4] Remove external devices
You probably know how dangerous it can be to plug in USB cables into your computer. But did you know that some external devices can actually damage your device? If you don’t want to risk losing data, make sure to disconnect all external peripherals. You might think that just unplugging the cable is enough, but there are many cases where the problem persists even after you’ve disconnected the power supply. In fact, certain types of memory cards can even corrupt your operating system. To avoid such situations, always keep your computer clean and free from debris.
We highly recommend that you use this tool for your error. Furthermore, this tool detects and removes common computer errors, protects you from loss of files, malware, and hardware failures, and optimizes your device for maximum performance. This software will help you fix your PC problems and prevent others from happening again:
Updated: July 2025

Why is the CPU being used up to 100% when nothing is running?
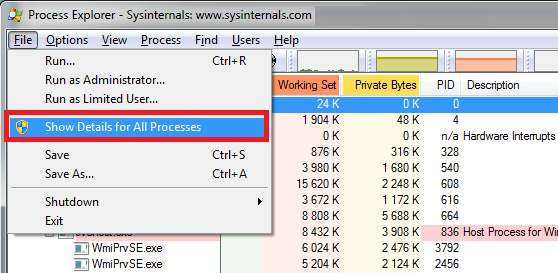
Process Explorer is a free tool that allows you to monitor processes in real time. You can use it to find out what programs are taking up most of your computer’s processing power. This article explains how to use Process Explorer to identify processes that are causing high CPU usage.
CPU Usage Graph
The graph displays the percentage of CPU usage over time. When there is no activity, the graph shows 0%. As soon as something starts consuming CPU cycles, the graph changes accordingly.
In our example, we see that the CPU usage spikes to 100% every few seconds. We can tell that this is because multiple processes are being executed simultaneously. Each process uses some amount of CPU cycles, depending on its complexity.
When a program runs, it usually creates several threads. These threads are independent pieces of code that run concurrently. If one thread takes longer than expected, it might slow down the other ones. This causes the overall performance of the system to degrade.
If you want to know exactly which process is responsible for the spike, select the Process tab. Then double-click the selected process to open its Properties dialog box. On the Performance tab, you can see the current CPU usage.
You can also view the number of threads that each process has spawned. To do this, right-click the process name and choose Threads from the context menu.
What are Windows live tiles?
In previous versions of Windows, you could set up live tiles. They showed information about what was happening on your computer. For example, you might see the weather forecast, the number of unread emails in your inbox, or even the current stock price. You could also add custom tiles and pin them to the Start menu.
But in Windows 10, Microsoft removed the ability to customize the appearance of the tiles. Instead, it just displays the name of the program. And there is no option to turn off the live tiles altogether. If you want to hide them completely, you must use another method.
What happens when I set my computer to work at its best?
When you set your system for optimal performance, many things will occur, including disabling certain features. In fact, Microsoft recommends that you disable most of the power management options on your computer because it will cause problems. You might want to think twice about doing this, though, since there are plenty of reasons why you might want to use those settings.
To start, let’s look at what happens when you enable the Balanced Power Plan. As you can see, the screen turns off automatically after 30 minutes of inactivity. This is great if you want to save battery life, but it could also mean that you won’t notice something important happening on your PC. For example, if you receive an email while your computer is sleeping, you won’t know about it.
The same goes for automatic sleep mode. If you don’t want your computer to go into sleep mode, you must turn off this feature in the Settings app. However, turning off automatic sleep mode doesn’t always solve your problem. Sometimes, the reason your computer isn’t waking up is because you accidentally disabled the wake password. To fix this issue, open the Start menu and type passwords and security in the Search box. Then, select Change Password. After entering your current password, enter a new one and confirm it. Your computer will now wake up whenever you press the keyboard or mouse button.
If you want to change the way your computer sleeps, head over to the System section in the Control Panel. Click Sleep & Hibernate and then choose the option that works best for you.
Is CPU spiking normal?
CPU spiking is one of those things you don’t really think about unless it happens to you. But what does it mean? Is it something to worry about? What causes it? And how do I fix it?
In this video we’ll take a look at what CPU spiking actually is, why it happens, and what steps you can take to prevent it.
RECOMMENATION: Click here for help with Windows errors.
Frequently Asked Questions
If I turn off the DcomLaunch service, what will happen?
If you’re running Windows 10 Pro x64, it’s very likely that one of the following services depends on DCOM Server Process Launch (DcomLaunch):
– Microsoft Office 2016
– Microsoft Exchange 2013
– Microsoft SharePoint Foundation 2010
– Microsoft SharePoint Online
You’ll notice that the list includes some pretty big names like Microsoft Office 2016 and Microsoft Exchange, both of which are used by many businesses. You don’t want to risk having these apps stop working because of a problem with DCOM Server Process Launcher.
In fact, even if you aren’t running Windows 10 Pro x86, there’s still a good chance that one of these services depends on DCOMServerProcessLauncher. In fact, most of the services listed above do.
How do I fix DCOM server process launcher error?
DCOM Server Process Launcher Error is a common issue when running Microsoft Windows operating system. There are several reasons behind this error message. Here we discuss some possible causes and solutions for this error.
1. DCOM Server Service Not Running
This is probably the first reason for getting this error. To resolve this issue, please ensure that DCOM service is started.
2. DCOM Client Access Service Not Started
Another cause of this error is that DCOM client access service is not started. 3. DCOM Server Is Unavailable
In case DCOM server is unavailable, you may also receive this error. To resolve the issue, restart the computer.
4. DCOM Server Has Stopped Working Properly
Sometimes due to hardware failure or virus attack, DCOM server stops working properly. To resolve this issue reboot the machine.
5. DCOM Server Has Been Shut Down Manually
You may shut down DCOM server manually. To do so, press Ctrl+Alt+Delete keys simultaneously. Select Start Task Manager and stop DCOM server.
6. DCOM Server Has Failed To Launch
If you are unable to launch DCOM server, try following solution.
a. Reboot the PC.
b. Restart the computer.
c. Run the command “net stop dcomsvc”.