Updated July 2025: Stop error messages and fix your computer problem with this tool. Get it now at this link
The problem occurs when you play games or watch videos. If you are playing video games or watching movies, it might cause high CPU usage. This article explains how to fix this issue.
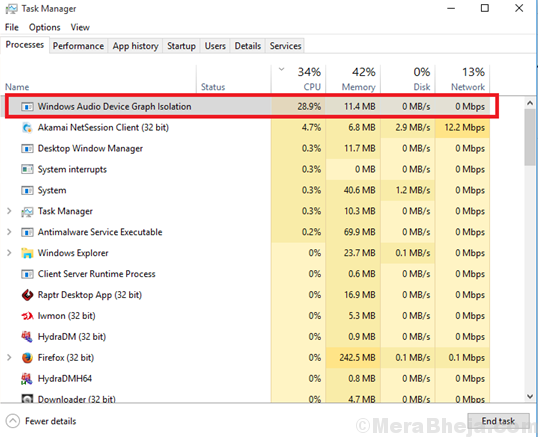
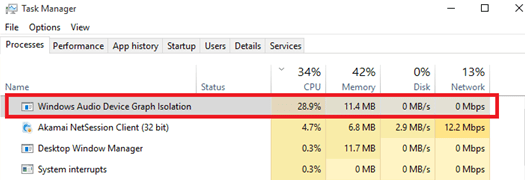
High Processor Use by audiodg.exe
We are facing high cpu usage issues due to Audiodg.exe process while playing music files. This application is used by Windows Media Player to play media files. If you are experiencing this problem please follow the steps given below.
1. Open Task Manager
2. Select Processes tab
3. Find Audiodg.exe under “Media Players” subcategory
4. Right Click on it and select End task
5. Restart PC
6. After restarting computer check whether the problem still persists. If yes, repeat step 5 again.
Solution 1 Lower the audio sample rate
When you record audio, you might want to increase the quality of your recording. But doing so will use up a lot of disk space. So how do you know what sample rate to choose? You could just guess, but there are better ways to figure out the best sample rate for your audio files. Here’s one way to find out:
1. Record some test samples.
2. Open each sample in Audacity and change the sample rate.
3. Save each sample again.
4. Compare the sizes of the saved files.
5. Choose the lowest sample rate that gives you the smallest file.
6. Repeat steps 3–5 for different sample rates.
Solution 2 Disable Audio effects
To disable audio effects, go into the Sound Settings window (Windows 7). Click on the Playback tab and rightclick on the speaker icon. Select Properties. In the playback tab, select None for Enhancements. This disables all enhancements such as reverb, echo, etc. If you want to use some of the features, simply check the boxes next to each one.
Solution 3 Update driver of sound card
If you are having problems with audio playback, it could be due to outdated drivers. If you are experiencing issues with the audio output device, such as no sound coming out of speakers or headphones, you might want to try updating the drivers of your soundcard. This article will show you how to do that.
To find your sound card model number, open the Device Manager and look under Sound, video and game controllers. Once you locate your sound card, double-click it to open up the Properties dialog box. In the General tab, look for the Driver Version field. Copy down the value next to it and compare it against the current version of your sound card driver. A newer version of the driver might solve your issue.
You can download the latest stable release of your sound card driver from the manufacturer’s website. Alternatively, you can use third party software like Driver Booster Pro to automatically install the latest versions of your sound card drivers.
We highly recommend that you use this tool for your error. Furthermore, this tool detects and removes common computer errors, protects you from loss of files, malware, and hardware failures, and optimizes your device for maximum performance. This software will help you fix your PC problems and prevent others from happening again:
Updated: July 2025

Solution 4 Disable volume adjustment
If you are having issues adjusting the volume of your speakers, here are some ways to fix it.
1] Make sure there is no software running on your computer. If you see a notification saying “Windows Audio Service”, close it.
2] Restart your PC. This will restart Windows’ audio driver.
3] Close all programs except Chrome.
4] Click on the speaker icon located on the bottom right corner.
5] Select Playback Settings.
6] In the dropdown menu next to Output Devices, select Speakers.
Solution 5 Update your game or concerned software
If you are having problems with your game or concerned software, make sure you update it. Often times, there are patches or fixes out there that can help resolve issues. If you don’t know how to do this, check out our guide here.
Solution 6 Update the sound card and other hardware drivers responsible for sound effects.
The solution is simple: update all the drivers for your sound card and audio input / output devices. If you are experiencing problems with sounds such as those produced by Windows Media Player, it could be because there is a conflict among different versions of drivers installed on your computer.
You can check whether the version of the driver you use is compatible with the operating system version of your PC. Then, select the device whose driver you want to know about and press Properties. In the Details tab, look for the Driver Version number. This value indicates the version of the driver that is being used. If the version does not match the one listed in the operating system, you must install the correct driver.
If you do not see the version number, go to the bottom left corner of the window and click More Info. A dialog box appears showing the version of the driver and the manufacturer name. Click OK to close the window.
RECOMMENATION: Click here for help with Windows errors.
Frequently Asked Questions
Can I Disable the Audiodg.exe Process?
The audiodg.exe process is significant for the proper function of some Windows applications, and therefore it shouldn’t be deleted or disabled. But if you do disable it, you won’t hear anything on your PC. This could mean you’re missing out on important sounds like music, alarms, notifications, and alerts. You might even miss something important happening on your desktop.
To fix this issue, follow these steps:
1. Open Task Manager by pressing CTRL+ALT+DELETE keys together.
2. Right-click the “audiodg.exe” process and select End task.
3. Restart your computer.
4. Check whether the problem persists.
5. Delete the audiodg.exe files if needed.
6. Reinstall the application if necessary.
7. Reboot your system once again.
How to Decrease Audiodg.exe CPU Usage
The audiodg.exe is one of the most annoying programs running in Windows 10. This program runs every time you start up your computer, and it consumes lots of resources. If you want to reduce the CPU usage of audiodg.exe, follow our instructions below.
Step 1. Open the Start menu and type “task manager” into the Search box.
Step 2. Click “Start” to open the task manager.
Step 3. Right-click “audiodg” and choose “End Task”.
Step 4. Press CTRL+Shift+ESC to bring up the System Properties window.
Step 5. Go to the Startup tab and uncheck the “Enable startup items” option.
Step 6. Restart your PC and check if the problem persists.