Updated July 2025: Stop error messages and fix your computer problem with this tool. Get it now at this link
WifiTask is a legitimate Windows process which runs in background without interfering with your work flow. However, sometimes it gets misused by cybercriminals to spread malware and spyware. If you are unable to find the culprit behind this malicious activity, there is no way to remove wifitask. exe from your PC unless you uninstall the entire operating system.
How does Wifi Task start?
When you connect to a Wi-Fi network, Windows automatically starts WifiTask. This process helps Windows determine whether it needs to download additional drivers for your wireless adapter. Then select View detailed status information and uncheck the box next to Show hidden processes.
What happens if I don’t want WifiTask running?
If you don’t want WifiTasks to run, you can disable it by following the steps mentioned above. Alternatively, you can use third party tools like CCleaner to delete the registry entry associated with WifiTask.
Why do some people say WifiTask is dangerous?
Some reports claim that WifiTask is responsible for downloading unwanted programs onto your device. This is untrue; WifiTask doesn’t install anything on your machine. In fact, it’s just a helper application that lets Windows know about your wireless card driver.
wifitask.exe in Solutions for Windows 10
WifiTasks.exe is a program that runs automatically every time you start your laptop or desktop PC. This process is called auto-start. You might wonder what it does, how it works, and why it needs to be there. The good news is that you don’t have to worry about it because it doesn’t do anything harmful to your system. In fact, it just helps you connect to Wi-Fi networks faster. However, you still want to know what it does, how exactly it works, and why you should disable it.
In this article, we’ll show you how to find out what the “WifiTasks.Exe” process actually does. We’ll explain how it works and how you can stop it from running.
What Is Wifitask. Exe?
WifiTasks is a program that runs whenever you turn on your PC. It scans your network connections and connects to the fastest one. Once the connection is established, it starts downloading files from the internet. These files include software updates, drivers, games, apps, and even music and movies.
Why Does My Computer Need Wifitask. exe?
There are several reasons why your computer needs WifiTasks.exe. For example, most laptops come preinstalled with Wi-Fi hardware. When you boot up your machine, it checks whether the wireless adapter is working correctly. If it isn’t, it downloads the driver and installs it.
We highly recommend that you use this tool for your error. Furthermore, this tool detects and removes common computer errors, protects you from loss of files, malware, and hardware failures, and optimizes your device for maximum performance. This software will help you fix your PC problems and prevent others from happening again:
Updated: July 2025

What is wifitask.exe in Windows 10?
Wifitask.exe appears in Windows 10 as part of Microsoft Edge browser. This application is not safe and should never be used. If it is installed on your computer, it might cause problems such as system crashes, errors, and data loss. You should uninstall this software immediately.
If you are unable to find this file, please use our guide to locate hidden files and folders on your computer.
What’s wrong with wifitask.exe in Windows 10?
Task Manager is one of those tools you probably never use unless something goes wrong. But it turns out that task manager is actually quite useful. If you are experiencing errors like “wifitask.exe”, here’s what you do about it.
If you’re running Windows 7 or 8, there’s no need to worry. Just close down the program and restart your computer. You’ll find that everything works fine again. However, if you’re running Windows 10, you might want to try this.
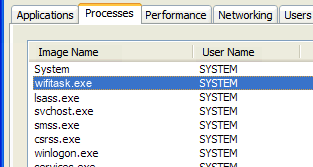
First, open up Task Manager. Then look under Processes tab. Here, you’ll see a list of processes that are running. Look for anything named ‘wifitask.ex’. If you don’t see it, just wait a little while and it’ll show up. Now, click End Process. This will kill off the offending application. Restart your PC and you should be good to go.
How to find out if Windows 10’s wifitask.exe is safe?
There are many virus creators who put malicious code into a process and give it a name like wifitask.exefor example, they want to trick people into thinking that it is a legitimate program. But, there are times when you might come across something strange with wifitask exe in Windows 10, so here we provide you a step-by-step guide to help you identify whether it is a virus.
The best way to know about wifitask.Exe is to look at its properties. To do this, press CTRL + Shift + Esc at once to open Task manager. Then, go to More Details option under the Processes tab and select the one called wifitask. Exe. If you don’t find it, just try again.
Once you found wifitask.EXE in the task manager, click on Start button, type cmd in the Search box and hit Enter key. A command prompt window will open up. Now, enter the following command –
If you find wifitask exefile in the list, then it is not a virus. Otherwise, it is a threat. You can stop it by typing exit in the command prompt window.
Now, let us discuss how to fix it.
You can download Avast antivirus software and scan your PC for viruses. If you find any threats, then you can delete it easily.
How to fix wifitask.exe in Windows 10?
Wifitask.exe isn’t harmful to the computer, but many people mistake it for malware because of its name. This error usually happens during installation of programs or while trying to download something over the internet. If you see this error, don’t panic; there are several steps you can take to resolve the issue.
Step 1: Open Control Panel
Step 2: Click Uninstall a program
In the left pane, select “Uninstall a Program”, and then choose “WifiTasks”.
Step 3: Delete the file
Select “Delete files associated with the selected item”, and then confirm the deletion.
Step 4: Restart PC
Restart your system once again, and try downloading something else. If the problem persists, contact our support team.
Scan for Virus
Wifi Tasks is a simple tool that helps you scan for viruses on your phone. With it, you can check whether there are any malicious files or folders on your device. You don’t even need to download anything – just open the app and start scanning.
If you find any suspicious files, you’ll see a list of them in the main window. Just tap on one of those files to view its information. You can either delete it now or later. To do that, simply drag the file into the trash icon.
You can also choose to delete the entire folder containing the virus. This way, you won’t have to worry about losing important data.
The app works on both Android and iOS devices. So far, we’ve tested it on Android phones running version 4.4 KitKat and above. We haven’t tried it on iPhones yet.
Verify the Windows Account
If you are having trouble logging into your Microsoft account, it could be because your account is in the unverified state. This happens sometimes when there is an update to Windows 10. If you want to verify your account, follow these steps:
1. 2. In the list of accounts, select the account you wish to verify.
3. Select Change password.
4. Enter your current password and confirm it. Then enter your new password twice and confirm it.
5. Log out of all applications, close all browser windows, and log back into the account. You should now see a green check mark next to the account name.
6. Go back to Step 2 and repeat the process for any additional accounts you have set up.
Run System File Checker (SFC)
If you are facing issues while installing programs/software, there could be some corruptions in the system registry. In such cases, it becomes necessary to scan the entire system file and repair errors manually. This process involves running SFC tool to fix the errors. If you want to know how to use SFC tool, follow the steps given below.
Steps to Use SFC Tool
1. First of all, launch the command prompt window by pressing Win+R keys together.
2. Now copy and paste the following code into the command prompt and hit Enter key.
3. Type “sfc /scannow”.
4. Press Enter again to execute the command.
5. Wait till the completion of the operation.
Check for updates
To make sure you are running the most recent version of Windows 10, open Start menu and press Windows logo key + I. Then, type “update & security”. If there is an update, it will show up.
You should install the latest version.
Windows Restore
Microsoft’s latest version of Windows 10, dubbed Windows 10 April 2018 Update, includes a built-in feature called System Restore. This tool allows users to rollback their computer to a previous state, similar to how Apple offers Time Machine. However, unlike Apple’s solution, Microsoft’s tool doesn’t require third party software or external storage devices. Instead, it works directly within Windows 10 itself.
When restoring a system, make certain to pick the correct restore point. If you are unsure about what a specific restore point represents, you can check out our guide here. Once restored, the system will go into a clean boot mode. Users can access the System Restore utility by pressing the Win+R keys together, typing “systemrestore” and hitting enter.
The process takes just a few minutes, depending on the size of your hard drive. After it completes, the computer will reboot normally. You won’t notice any difference besides having a cleaner OS.
Reinstall Windows 10
If you’re having problems connecting to Wi-Fi networks, it could be because your device isn’t compatible with the latest version of Windows 10. If you’ve already installed the operating system, there are several methods to revert back to previous versions. Here are some tips to help you resolve the issue.
RECOMMENATION: Click here for help with Windows errors.
Frequently Asked Questions
Are Too Many Background Processes Hogging Your CPU?
When you use a computer, you’re probably familiar with how quickly things load up. If you’ve ever waited for an application to start up, you know what I mean. However, there’s another factor that could slow down your system — too many background processes.
Your computer runs several applications in the background, including ones that help keep your files organized, such as Microsoft OneDrive. Other apps like Chrome, Firefox, and Edge can store cookies and cache data locally, making it easier to navigate your favorite sites without having to wait for the server to respond. And then there are those pesky background tasks that just seem to pop up out of nowhere.
Is the WMI Provider Host (WmiPrvSE.EXE) Causing High CPU Usage?
The WMI Provider Host (also called WmiPrvSE), is one of those processes that most people don’t think about much. However, it’s important to know how to manage it because it can cause high CPU usage. In fact, it’s common for the WMI PrvSE process to consume up to 5% of system resources. This could lead to slow performance or even crashes.
You can check if this is happening to you by opening the Task Manager and viewing the Processes tab. Look for a process named “WmiPrvSE”. If the CPU usage is above 2%, there might be something wrong with the way it’s working.
If you want to find out what’s causing the issue, you’ll need to dig deeper into the registry. Open Regedit and navigate to HKEY_LOCAL_MACHINE\SOFTWARE\Microsoft\Windows NT\CurrentVersion\Winlogon\. There you’ll see a key named StartupParameters. Double-click on it and look inside. Here you’ll find a value named DefaultUserName. Change this value to whatever username you use to log onto the computer. Save the changes and restart the computer.
When you run the command net start wmiprvsrvc, you’ll notice that the CPU usage drops down to normal levels. Once you’ve done that, you can close Regedit.