Updated July 2025: Stop error messages and fix your computer problem with this tool. Get it now at this link
Fix Shell’s infrastructure Use a lot of CPU and memory.
The Shell Infrastructure Host component uses a lot of resources on Windows 10. If it runs out of memory, it will start consuming CPU cycles. This can lead to slow performance and even cause system crashes. In some cases, the Shell Infrastructure Host component might use up to 30% of the total physical memory on a machine. Here are three ways to solve this problem:
Restart your computer.
If you restart your computer, the operating system will reload itself and the Shell Infrastructure Host component will stop running. After rebooting, you can check whether the issue persists.
Restart the Shell Infrastructure Host process. You can do this manually or automatically. For manual restarting, follow these steps:
1. Open Start menu.
2. Type shellhost.exe into the Search box.
3. Right-click on the resulting entry and select “Run as administrator.”
1] Restart your computer
There are numerous ways to restart your PC without having to power it off completely. Here are some of our favorite ones.
1] Restart your Computer
This one is pretty simple. All you have to do is press and hold the power button on your machine for about 10 seconds. If you don’t know how to access the power button, check out our guide here.
2] Shut Down Your Computer
If you’re feeling lazy, simply shut down your machine by pressing and holding the power button and then releasing it. You’ll see “Shutting down…” pop up on screen. Once it does, release the power button.
3] Force Shutdown Your Machine
2] Start the Shell Infrastructure Host process over again.
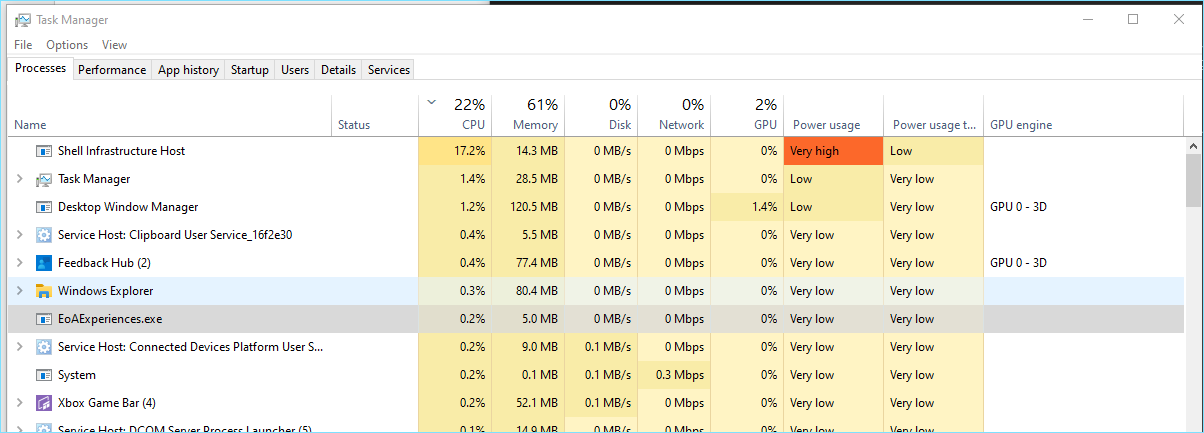
Open the Task Manager and look for the Shell Infrastructure Host under the Processes tab.
Right-click on it and pick the “End task” option.
Then turn your computer back on.
This will make things better.
We highly recommend that you use this tool for your error. Furthermore, this tool detects and removes common computer errors, protects you from loss of files, malware, and hardware failures, and optimizes your device for maximum performance. This software will help you fix your PC problems and prevent others from happening again:
Updated: July 2025

3] Use an anti-adware and anti-malware tool to scan your PC.
Antimalware programs are designed to detect malware on your computer, including spyware, adware, viruses, trojans, worms, rootkits, dialers, keyloggers, etc. They usually come bundled with security suites such as Internet Security Suite, McAfee AntiVirus Plus, Norton 360, Kaspersky Internet Security, AVG Free, Avira Free, Bitdefender Total Security, Panda Cloud Security, Sophos Home Premium, Microsoft Security Essentials, Comodo Dragon Web Protection, Malwarebytes Anti-Malware, ESET NOD32 Antivirus, etc.
If you’re looking for something free, try CCleaner. It’s a very simple program that allows you to easily scan your computer for unused files, cookies, temporary internet files, cache, browsing history, etc.
You can use it to delete cookies, clear your browsing history, clear your cache, clean up your temporary internet files, delete unused applications, uninstall unwanted programs, defragment hard drives, optimize Windows performance, and much more.
CCleaner is freeware and open source, meaning anyone can download and use it without paying anything. You can even make money by selling advertising space on your home screen.
4] Run System Maintenance Troubleshooter
Windows 10 includes a troubleshooting tool called the System Maintenance Troubleshooters. This tool helps you identify and resolve some common system maintenance issues. If you run into any issues while installing software, updating drivers, or configuring settings, it might be helpful to use this tool.
To start running the tool, select “Troubleshoot,” then follow the prompts.
If you’re having trouble finding the tool, here are some additional steps:
1] Open the Start menu
2] Type “System Maintenance” into the Search box
3] Select “System Maintenance Troubleshooter.”
You’ll see a list of options such as “Repair Your Computer” and “Fix Problems With Apps”. These options include fixes for common problems like missing files, registry errors, startup items, and more.
5] Reinstall Microsoft Redistributable Packages
Microsoft provides several software packages that are required to run some applications. These packages include Visual Studio,.NET Framework, Windows SDK, etc. If you are facing issues while running certain applications, it could be because of one of the above mentioned packages. To fix such problems, you must uninstall the previous versions of the packages and install the latest versions. In case you don’t know how to do that, here are the steps:
2] Click Uninstall button next to the application/package name
3] Choose “Remove completely” option
4] Wait till the process completes
5] Restart your computer
6] Install the latest version of the same package again
6] Reinstall the Photos app
The Photos app is one of the most used apps on iOS devices. However, it has been plagued with memory leaks since its launch in 2013. If you are experiencing problems such as slow performance, crashes, and freezes, you might want to consider reinstalling the Photos app.
This issue occurs because some photos do not get deleted properly from the device. As a result, the Photos app consumes too much RAM and causes system instability. To resolve this problem, uninstall the Photos app and download it again.
7] Run SFC to repair this single file
System File Checker (SFC) is a free tool included with Windows 10 that allows you to check for problems with Windows components such as the operating system, device drivers, security software, applications, settings, and hardware. If it finds anything wrong with one of those items, it displays a list of recommended fixes. You can run the program manually or schedule it to automatically update itself every week.
RECOMMENATION: Click here for help with Windows errors.
Frequently Asked Questions
Why is Shell Infrastructure’s CPU so high?
Shell Infrastructure Host is a component of Windows 10 responsible for managing storage volumes and file systems. When it starts up, it causes your computer to use a lot of resources. This could cause performance issues and slow down your system. In some cases, it could even crash your operating system. To fix this problem, you must uninstall Shell Infrastructure Host completely. Here’s how to do it.
Why does Shell Infrastructure Host need so much Memory?
ShellExperienceHost.exe is one of the most important components of Windows 10. This utility is responsible for displaying the Start menu and the taskbar. But what happens when this process uses too much RAM? In some cases, it consumes up to 20% of the total physical memory on the computer. You might think that the problem lies within the operating system itself, but it is actually due to the fact that this application is running multiple instances of itself simultaneously.