
- Download and install the software.
- It will scan your computer for problems.
- The tool will then fix the issues that were found.
If MS Outlook is used when connecting to an Exchange server, all mailbox data is stored locally on the server in a file called an OST (Offline Storage Table) file. This file can be thought of as a replica of the user’s Exchange mailbox, since all account entries are stored locally on the server. The primary role of this file is important when an Exchange server crashes due to technical problems or maintenance work. In such cases, users can continue to work locally on the OST file without any interruption, and any changes they make to the account will be merged into their Exchange account as soon as the server is restarted.
However, there may be times when users run into errors when trying to access their Exchange mailbox data through an OST file. These errors can be caused by incorrect synchronization between Outlook and Exchange, or problems with the OST file. In most cases, problems with the OST file cause mailbox access errors.
OST file can be damaged for various reasons. These include damage due to oversized size, virus attack, damage due to accidental shutdown, etc. While these are the most common causes, OST problems can often arise from human error. Let’s take a look at the scenario.
Let’s say you are using Outlook 2010 or 2013 and you receive the following error when sending / receiving emails:
“0x8004010F: Cannot access Outlook data file.”
or
“0x8004010F: The operation failed. Object not found. “
Locate the Outlook Data File (PST).
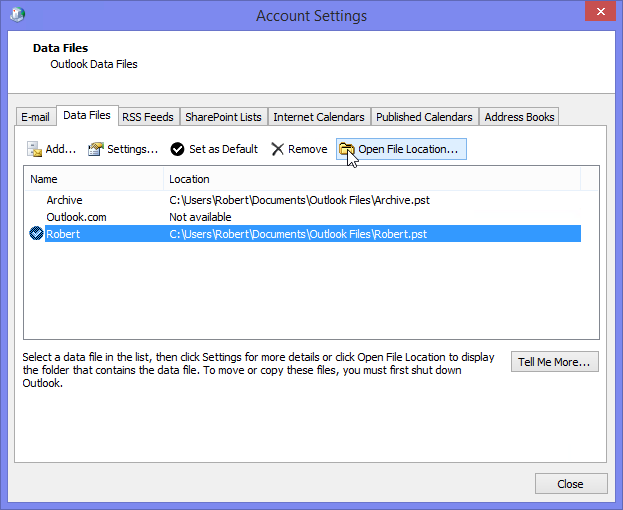
Start the Outlook app. Click File> Account Settings> Account Settings.
In Account Settings, under the Data Files tab, note the name and location of the default Outlook data file (the default data file is always on). Click Close.
Updated: July 2025
We highly recommend that you use this tool for your error. Furthermore, this tool detects and removes common computer errors, protects you from loss of files, malware, and hardware failures, and optimizes your device for maximum performance. This software will help you fix your PC problems and prevent others from happening again:
- Step 1 : Install PC Repair & Optimizer Tool (Windows 11, 10, 8, 7, XP, Vista).
- Step 2 : Click Start Scan to find out what issues are causing PC problems.
- Step 3 : Click on Repair All to correct all issues.

Create a new Outlook data file
Open your Outlook 2010 profile and review the following items.
- File -> Account Settings -> Account Settings -> Account Settings -> Account Settings -> Account Settings
- Click Outlook Folder, then click New Outlook Data File. Here you can assign a temporary name to the data file.
- Click the + sign next to a folder name to expand all subfolders. After expanding it, select “Inbox” and click “OK”.
- Click the Edit folder and select a different folder.
- Click the + sign again and expand the subfolder, select Inbox and click OK.
That’s all. Close the account settings page and click Send / Receive.
Create a new Outlook profile
Create a new profile in Outlook
If you are creating a new Outlook profile with an IMAP / POP3 account, you can do it manually or use automatic account setup. Both options are presented here:
Use automatic account setup to create an Outlook profile
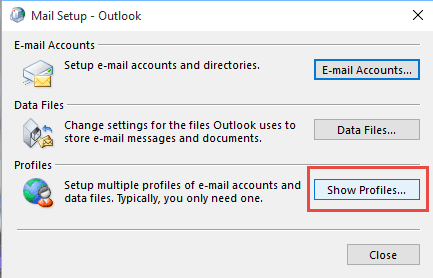
- Access the control panel. Then click Mail. The “Email Setup – Outlook” window appears.
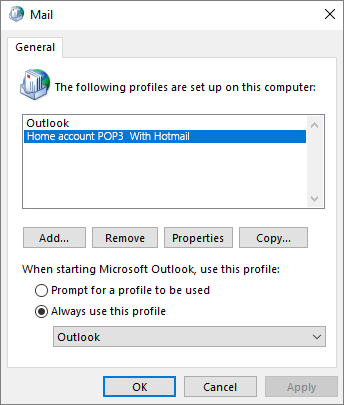
- In the Email Setup – Outlook window, click the Show Profiles button.
- In the Mail dialog box, click Add.
- Enter a new name for the profile in the New Profile window. Then click OK.
- Enter your credentials in the Add Account window and click Next. The account has been created.
Use the manual method to create an Outlook profile
To manually create a profile, do the following:
- In the Add Account section select Manual Configuration or Additional Server Types. Then click Next.
- In the Select a Service section, select POP or IMAP to connect to a POP or IMAP account, and then click Next.
- Enter your account information in your POP and IMAP account settings. Under Send Messages, select Existing Outlook Data File. Click Browse and select the Outlook data file for the previous account, then click OK. Then click Next.
- In the test account settings, click Close and then Finish.
RECOMMENATION: Click here for help with Windows errors.