- Download and install the software.
- It will scan your computer for problems.
- The tool will then fix the issues that were found.
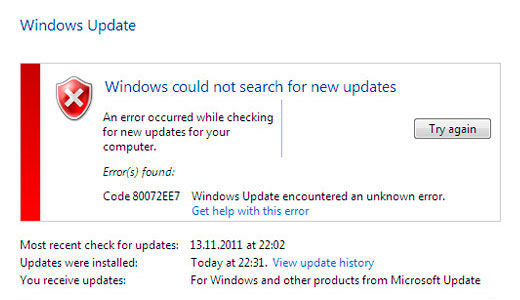
In this article, I will try to help you resolve Windows Update error 80072ee7 that occurs when you try to download Windows updates. The error code (80072ee7) itself stands for WININET_E_NAME_NOT_RESOLVED, which won’t tell you anything if you’re not a techie or Google Assistant. However, the error itself is caused by incorrect Internet settings.
In this guide, I will show you how to fix your internet settings to fix error 80072ee7 when you update. However, if this is your first time encountering this issue, you can try waiting a few minutes or try restarting your device and trying again.
Error code 0x80072ee7 can cause many problems on your computer. While talking about this error, users are reporting some common issues:
- Code 0x80072ee7 Windows Store 10. According to users, this error may appear when trying to launch Windows Store. When you face this problem, you need to repair corrupted files and see if it works.
- 0x80072ee7 Windows Update. This issue can occur when you try to run Windows Update. If so, make sure the required services are enabled and working correctly. You can also run a Windows Update reset script to reset these services.
- Windows 10 update error 0x80072ee7. This error can appear when trying to update to the latest version of Windows. It could be related to your antivirus program. So be sure to turn it off. In the worst case, you might even need to uninstall your antivirus.
- Windows 10 Media Creation Tool error 0x80072ee7. According to users, this error can also appear when using the Media Creation Tool. To fix this problem, edit your hosts file and see if that helps.
If you recently encountered these issues, they should be fixed as soon as possible, as it is highly recommended to install critical updates for Windows 10.
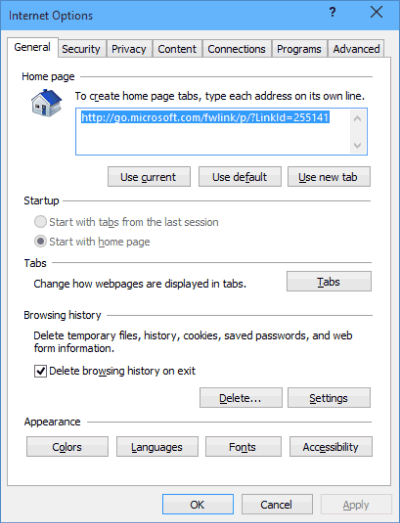
Activate the option “Automatically detect settings” in the Internet properties.
To ensure that (80072ee7) problems are not caused by incorrect Internet settings, we set the Internet options to Auto detect settings.
- Press Windows + R on your keyboard at the same time, type inetcpl.cpl and click OK. Or open Start and type inetcpl.cpl. Then type or click inetcpl.cpl.
- Click the Connections tab, then click LAN Settings.
- Then select the Automatically detect settings checkbox and click OK.
- Reboot your device
- Try running Windows Update again.
Modify the hosts file
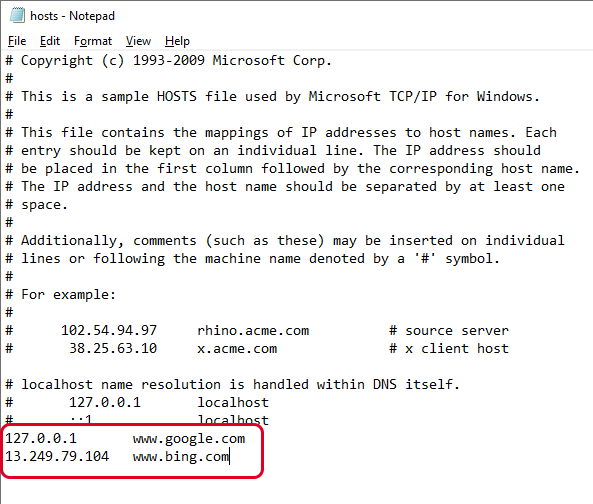
Another common cause of error 80072ee7 on your system is that a third-party application has modified your hosts file without your knowledge. Fortunately, you can delete changes to this file. All you have to do is:
Updated: June 2025
We highly recommend that you use this tool for your error. Furthermore, this tool detects and removes common computer errors, protects you from loss of files, malware, and hardware failures, and optimizes your device for maximum performance. This software will help you fix your PC problems and prevent others from happening again:
- Step 1 : Install PC Repair & Optimizer Tool (Windows 11, 10, 8, 7, XP, Vista).
- Step 2 : Click Start Scan to find out what issues are causing PC problems.
- Step 3 : Click on Repair All to correct all issues.

- First, make sure you start your computer with the correct administrator rights.
- Then press Windows Key + R, enter% systemroot% \ system32 \ drivers \ etc and click OK.
- This will open the folder, etc. From there, right click on the hosts file and select “Open”.
- A dialog box should appear. Select Editor and click OK.
- The hosts file opens, moves from here to the end of the file, and removes all entries under 127.0.0.1 localhost. Then click File -> Save.
Activate the option “Automatically detect settings” in the Internet properties.
To ensure that the (80072ee7) issues are not caused by incorrect Internet settings, we set the Internet options to Auto detect settings.
- Press Windows + R on your keyboard at the same time, type inetcpl.cpl and click OK. Or open Start and type inetcpl.cpl. Then tap or click inetcpl.cpl
- Now go to the “Connections” tab and then to “LAN Settings”.
- Then select the “Automatically detect settings” checkbox and click “OK”.
- Reboot your device.
- Try running Windows Update again.
RECOMMENATION: Click here for help with Windows errors.