Updated July 2025: Stop error messages and fix your computer problem with this tool. Get it now at this link
This issue occurs due to an unprotected Windows system running outdated versions of software. The problem occurs because some older applications are still running in the background. These applications use up memory and cause high usage of CPU cycles.
To fix this issue, please follow these steps:
1. Open Task Manager by pressing CTRL+ALT+DELETE simultaneously.
2. Click Processes tab.
3. Select svchost.exe process.
4. Right-click on it and select End task.
5. Restart computer.
6. Check whether the issue persists. If yes, repeat step 5.
7. If no, go ahead and restart the browser.
8. Enjoy browsing safely.
What is svchost.exe?
svchost.exe runs on Windows systems as a service host. This process is essential for the operation of the operating system. It is a vital part of the operating system. However, there are many different svchot processes running on your computer, and each one causes problems if it runs too long.
Why Does Svchost.exe (netsvcs) Utilize So Much RAM and CPU?
The reason why svchost process uses too much memory isn’t clear yet, but there’s a good chance that it’s related to the way Microsoft manages its services. A recent post on BleepingComputer explains how svchost.exe eats up system resources.
This issue affects both 32bit/64bit versions of Windows operating system. There’s no known solution for this problem.
The Major Culprit Behind: svchost.exe (netsvcs)
There are many different reasons why your computer might freeze up and become unresponsive. In some cases, there could be malware causing problems. In others, hardware failure might be the cause. But sometimes, even though everything seems fine, there is still something wrong with your computer.
In such situations, you might want to check out System Restore. This tool allows you to roll back changes made to your PC settings. If you find yourself unable to access important files, this feature lets you restore your PC to a previous state.
If you’re having trouble accessing files, here are three things you can try.
1. Check Your Hard Drive
Your hard drive stores data like documents, photos, music, videos, etc. When your hard drive stops working properly, you won’t be able to save anything. You’ll also lose any unsaved work. To make sure your hard drive isn’t damaged, run a disk check.
2. Make Sure Windows Is Up-To-Date
Windows 10 includes automatic updates. These updates keep your software current and ensure that your PC is protected against viruses and other malicious programs. However, if you don’t update Windows regularly, you could miss out on critical security patches.
We highly recommend that you use this tool for your error. Furthermore, this tool detects and removes common computer errors, protects you from loss of files, malware, and hardware failures, and optimizes your device for maximum performance. This software will help you fix your PC problems and prevent others from happening again:
Updated: July 2025

Solution 2: Microsoft Windows Update Client
Microsoft released an update to fix an issue where people could not access the internet. This caused problems with updating software and installing patches. If you are experiencing this problem, you can download the latest version of the WindowsUpdate client here. You must restart your computer once it is downloaded.
You can also disable automatic updates.
Solution 3: Clear Event Viewer Logs
To view the event log, open up the Start menu and press the Windows key + R keys together. Type “EventVwr.msc” into the run window and hit Enter. Click on the “View” tab and make sure that you are viewing the correct location. If it says “C:\Windows\System32\winevt\Logs”, you’re looking in the wrong place. You’ll want to look under “Application”. In my case, I’m looking at “Applications\Microsoft\Windows\CurrentVersion\Uninstall”. Once there, click on the “Clear Events” button. This will clear out all of the old events. Make sure you reboot afterwards.
If you don’t see the “Clear Events” option, try clicking on the “Refresh” button.
You could also use the following command to do the same thing:
%windir%\system32\logman.exe /query /clear
Solution 4: Install Every Available Microsoft Windows Update
Microsoft has been updating Windows 10 since it launched in July 2016. But there are some things you might not know about those monthly updates. Some of them include security patches, feature upgrades, and even minor bugfixes. And while many of us just accept these updates without thinking too much about them, we should really be paying attention to every single one of them. After all, it could save our computers from getting infected by viruses, malware, spyware, and more.
So here are four ways to make sure you’re always running the latest version of Windows 10.
1. Check Your System Requirements Every Month
Windows 10 requires a 64-bit processor and 2GB of RAM. If your computer doesn’t meet these requirements, you won’t be able to install the operating system. This isn’t something you want to happen because it’ll mean you’ve got a machine that’s no longer capable of performing basic tasks. So, check your system requirements once a month to ensure that everything’s up to date.
2. Use Automatic Updates
If you’d rather not manually download and install updates, you can set Windows 10 to automatically do it for you. Then scroll down to “Install updates.” Make sure the box next to “Automatically download and install updates” is checked. You can also choose whether to install recommended updates or important updates.
3. Keep Up With Monthly Rollouts
Solution 5: Scan Your Computer For Malware and Viruses
Scanning your computer for viruses and malware will allow you to find out what programs are causing the problem. If you see a lot of red flags, it might mean that there is a virus or malware infection on your machine. You can scan your entire system with one of many free tools like VirusTotal or G Data Antivirus Free. If you do not want to use a third party tool, you can download and run Microsoft Security Essentials directly from Windows Update.
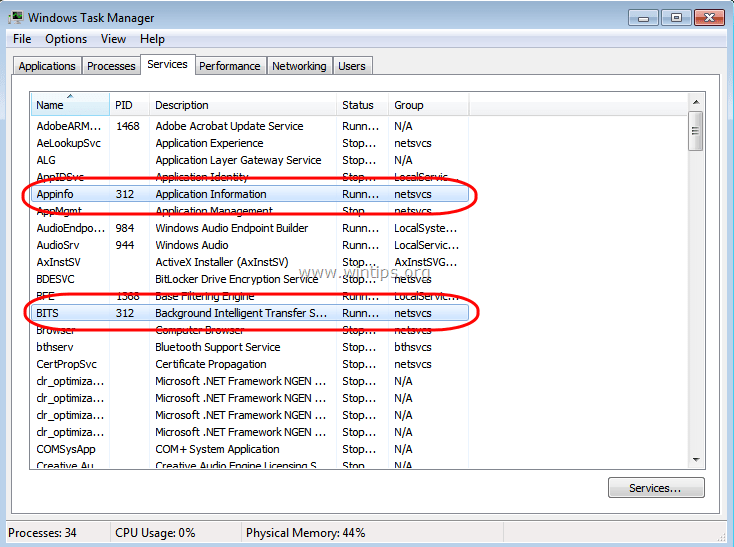
If you notice that the amount of RAM used by a particular application is increasing, it could be because of a memory leak. Memory leaks happen when a program fails to release unused resources. When this happens, the operating system needs to allocate more memory to keep up with the demands of the program. In some cases, this can lead to increased RAM usage. To fix this issue, you can stop the process that is consuming too much memory. You can do this by opening Task Manager and selecting the Processes tab. Scroll down to the section labeled Memory Usage and select the process that uses the most memory. Right-click on the selected process and choose End task to end the process.
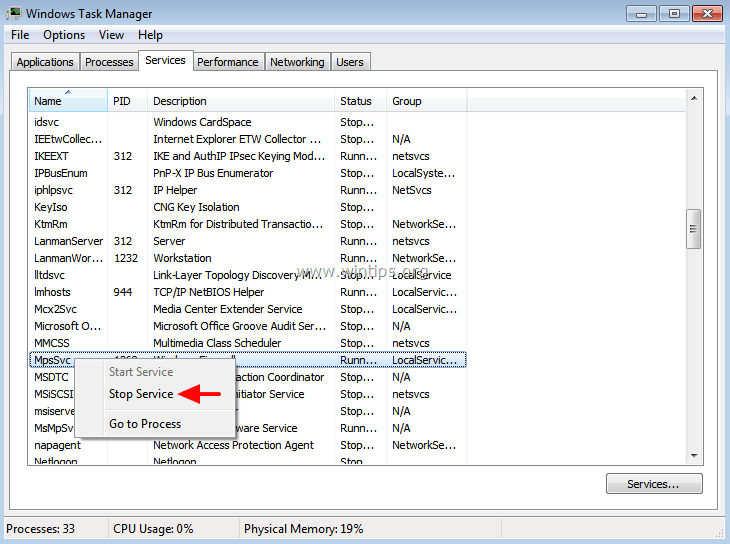
Solution 6: Turn off the BITS Service
BITS stands for “Big Internet Threat Scanner.” It scans your email messages for viruses and malware. If it finds something suspicious, it sends you an alert via SMS text message and/or email. You can disable BITS by following these steps:
1. Open Control Panel.
2. Click System and Security.
3. Under Windows Defender Firewall, select Turn off Windows Defender Firewall.
4. In the left pane, under Services, click Start Search.
5. Type bits into the search box.
6. Right-click Bits and choose Properties.
Solution 7: Remove/Disable the Wuauserv Service
The Windows Update Agent service (wuauservservice) consumes a lot of memory. If left unchecked, it can consume up to 80% of your system’s RAM. This can cause problems such as slow performance, crashes, and freezes. There are several ways to stop the service, including disabling it entirely.
To do so, open Command Prompt and type the following command:
sc config wuauservservice start disabled
You can also run netstat -aon | find “:80” to see what ports are being used by the wuauservservice.
If you want to reenable the service, simply reverse the above steps.
RECOMMENATION: Click here for help with Windows errors.
Frequently Asked Questions
Where can I locate Svchost.exe?
You can use Task Manager to see what processes are running. Then press Enter. In the Processes tab, look under Services.
Is svchost.exe (netsvcs) a virus?
The svchost.exe file isn’t malicious software; it’s a verified Windows file that’s required for your operating system (OS) to function properly. However, in some cases, a high resource usage of svhost.exe is caused by malicious applications or malware. These attacks run in the background, taking advantage of the svchot.exe process to harm the affected device.
This means that issues related to this process must be fixed immediately when noticed. If you’re experiencing slowdowns due to the svchot.exes process, follow the steps below to fix the problem.