- Download and install the software.
- It will scan your computer for problems.
- The tool will then fix the issues that were found.
An unspecified error “Failed to copy files or folders” can occur to any Windows 10/8/7 user when trying to copy and paste files to a new location. Why can’t you copy files or folders to the target device? There are so many.
Possible causes of unspecified errors in Windows
If you are not sure how or what caused the unspecified error while copying files or folders to your Windows computer, the following information can help you determine the cause of your current problem:
- Copied files are larger than 4GB: If the copied files are larger than 4GB and you want to copy them to a FAT32 partition such as USB or SD, this error message will be blocked.
- Hard disk is write protected: If the target partition or disk is write / write protected, data cannot be written.
- There is not enough free space on the destination disk: If there is not enough free space and the files to be copied are very large, data copying will not complete.
- The target disk is damaged or the file is encrypted
- System limitation
- The ownership of a file or folder has changed
These are the main reasons why you get a vague error message when copying files or folders.
Check the Volume Shadow Copy Service
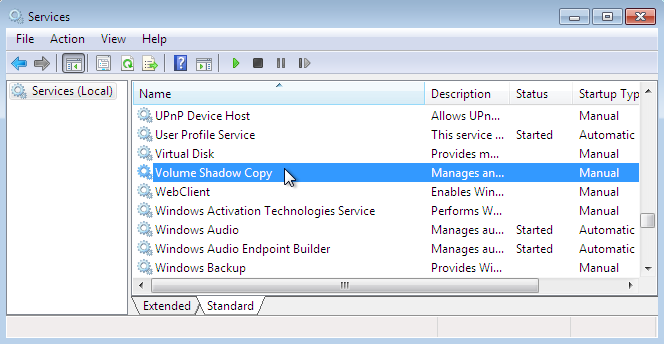
Check the Volume Shadow Copy Service in the service window. Follow these steps to ensure the following:
- Select Windows + X.
- Select the type of search box Services.
- Right click – Run as administrator
Make sure the services listed below are in the specified state and startup type.
The Volume Shadow Copy Service has started. Automatic start
Also check the dependency services required to start the Volume Shadows copy service.
To test this, double-click the service and go to the Dependency tab.
Use the Chkdsk utility
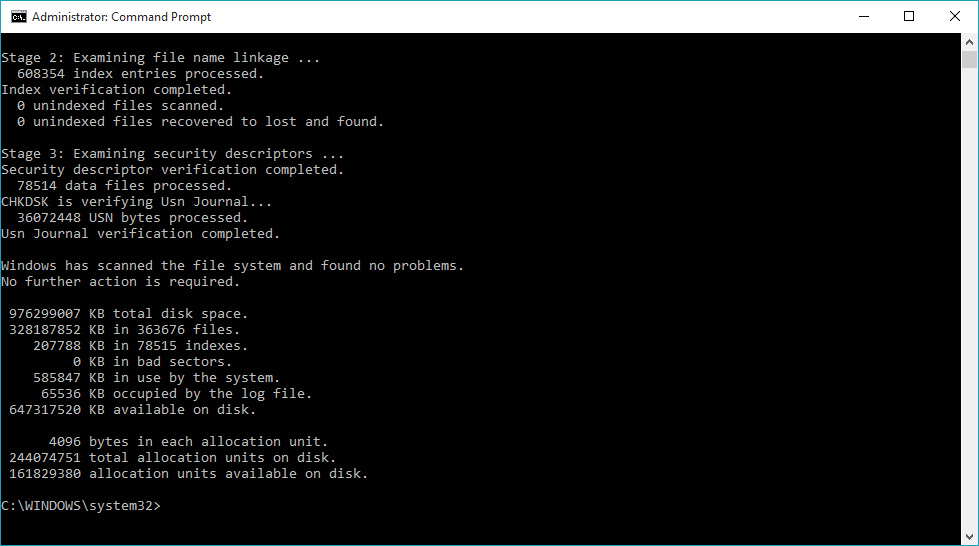
CHKDSK is a command that you can run on the command line to check the logical consistency of the file system. The full name of CHKDSK is actually checkdisk. As the name suggests, the hard drive was checked for errors and then repaired. CHKDSK works based on the file system of a particular partition to create and display disk status. If CHKDSK is entered without parameters, the status of the disc in the current drive is displayed.
Updated: July 2025
We highly recommend that you use this tool for your error. Furthermore, this tool detects and removes common computer errors, protects you from loss of files, malware, and hardware failures, and optimizes your device for maximum performance. This software will help you fix your PC problems and prevent others from happening again:
- Step 1 : Install PC Repair & Optimizer Tool (Windows 11, 10, 8, 7, XP, Vista).
- Step 2 : Click Start Scan to find out what issues are causing PC problems.
- Step 3 : Click on Repair All to correct all issues.

The CHKDSK utility is available on all versions of Windows; B. Windows XP / 7/8/10 and DOS. You can even run this command from your Windows installation disc.
Run it from the command line.
Step 1. Find Command Prompt on your computer as you like.
Step 2: Run Command Prompt as Administrator.
Step 3: Enter “chkdsk” (often followed by options such as “/ f”, “/ r” and “b”).
Step 4: Press Enter on your keyboard.
Reinstall Windows
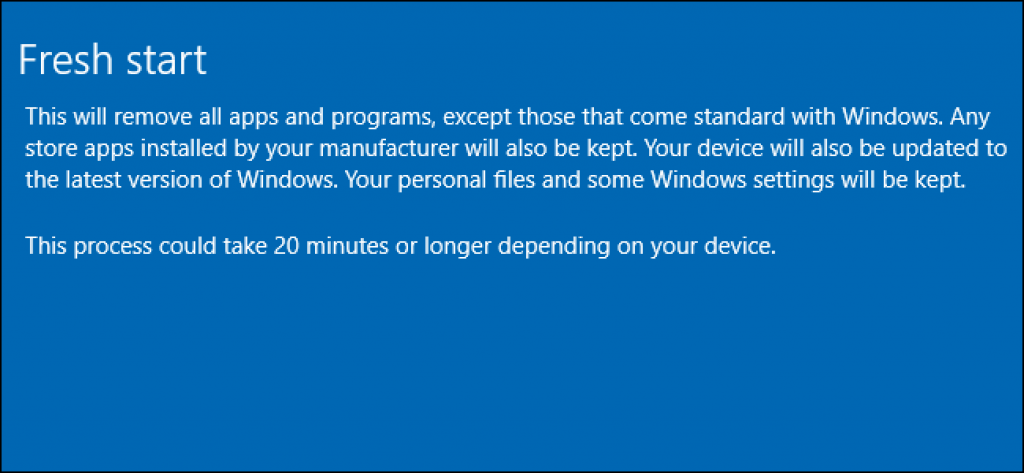
First, consider if you want to keep everything and reinstall Windows or clean the installation. In any case, it is very simple and straightforward.
If you don’t want to format or lose files, follow these steps.
- When you are in the installation wizard, select “Update”. This will save all your files and move the data from the C drive to the old Windows folder on the new C drive.
- It’s a simple process. The following pictures will help you during installation.
Final Workaround
To solve this problem, we will make sure that the data from the flash drive is not copied or backed up to the computer and then formatted in the NTFS file system (which allows 128 GB files) up to 256 So, depending on the used implementation is more than enough for your needs).
You can swap the file system by simply right-clicking the drive in Windows Explorer and then right-clicking “Format …” in the context menu.
In the Format menu (see above) change the file system from FAT32 to NTFS. Leave the Allocation Unit Size at the default 4096 bytes. Activate “Quick Format”. Click on “Start” to format the disk with the new file system.
Now that we are using a USB stick for large files, it’s time to transfer the large file and see what happens.
Conclusion
Success! Now that the flash drive is NTFS formatted, there is no problem accepting a file of 4 GB and above, and we can transfer that 7.63 GB ISO without any problem. Your large flash drive is now ready to receive large files.
RECOMMENATION: Click here for help with Windows errors.