
- Download and install the software.
- It will scan your computer for problems.
- The tool will then fix the issues that were found.
0x8007047e and other critical errors can occur if your Windows operating system is damaged. The opening of the program becomes slower and the reaction time increases. Crashes and freezes can occur with multiple applications. This error can be caused by a variety of reasons, including excessive startup entries, registry errors, hardware / RAM leaks, fragmented files, unnecessary or redundant program installations, etc.
0x8007047e occurs for many reasons, including malware, spyware, or programs not installed correctly. You can have all sorts of system conflicts, registry errors, and Active-X errors. 0x8007047e is an issue that occurs when an unexpected situation occurs or a scheduled operation fails. When you encounter an error in Windows, it can be critical and cause your programs to freeze, or it can be harmless but annoying.
Using DISM
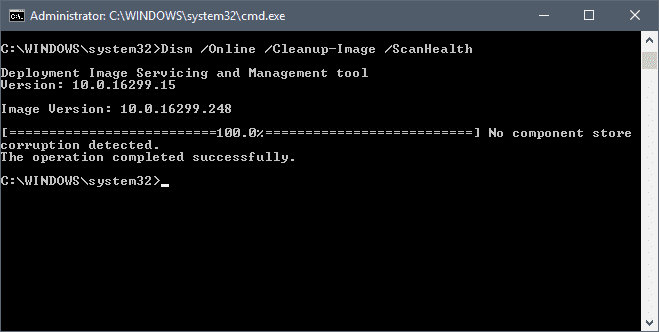
The Deployment Image Servicing and Management Command Tool gives you three main options for Windows 10 image recovery, including CheckHealth, ScanHealth, and RestoreHealth, and you want to run them in the listed order of their hierarchy. Also, depending on the complexity of the problem, you can use additional options with the RestoreHealth parameter to restore images from various sources.
To resolve issues with Windows 10 images using DISM, follow these steps:
- Open Start.
- Find Command Prompt, right-click the highest score and select the Run as Administrator option.
- Enter the following command to restore the Windows 10 image and press Enter:
DISM / Online / Cleanup-Image / RestoreHealth
After completing these steps, the Deployment Image Servicing and Management tool connects to Windows Update servers to download corrupted files to a local Windows 10 image and replace them as needed.
Using SFC Scan
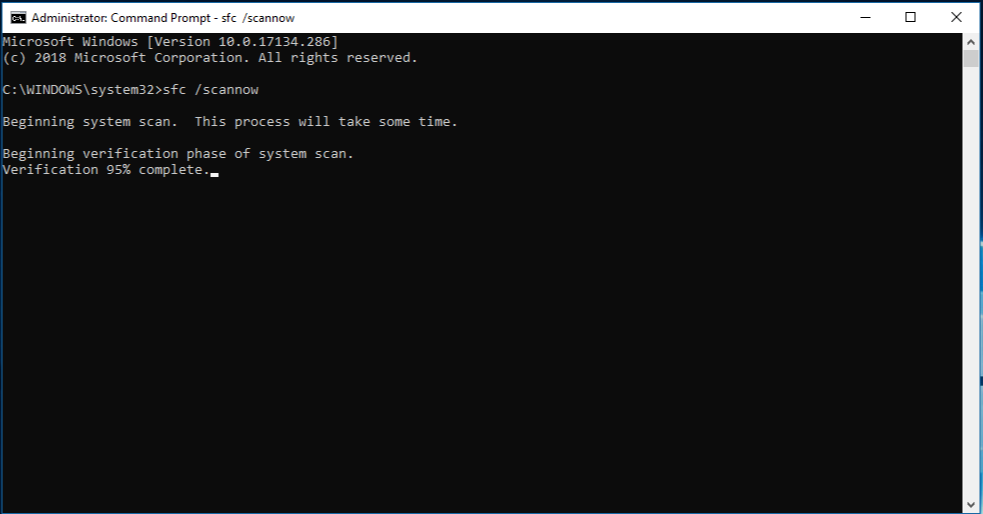
SFC stands for System File Checker.
SFC is a DOS command that is commonly used with the SCANNOW switch, separated by a /. SFC / SCANNOW is used to automatically detect and fix corrupted or missing files in Windows 10.
Updated: July 2025
We highly recommend that you use this tool for your error. Furthermore, this tool detects and removes common computer errors, protects you from loss of files, malware, and hardware failures, and optimizes your device for maximum performance. This software will help you fix your PC problems and prevent others from happening again:
- Step 1 : Install PC Repair & Optimizer Tool (Windows 11, 10, 8, 7, XP, Vista).
- Step 2 : Click Start Scan to find out what issues are causing PC problems.
- Step 3 : Click on Repair All to correct all issues.

To be able to use the SFC command in Windows, you must open an additional command prompt. If your Windows 10 PC won’t boot and you want to run a command from the outside, you need to boot your PC from Windows 10 bootable media and open Command Prompt from there.
- From the context menu, select Command Prompt (Admin).
- In the User Account Control confirmation box, click Yes to confirm your action.
- Wait for the administrator: a command prompt will open. Note. It is an advanced command line where you can run all commands without any restrictions.
- From the Admin Command Prompt: type SFC / SCANNOW and press Enter.
Reset TCP / IP
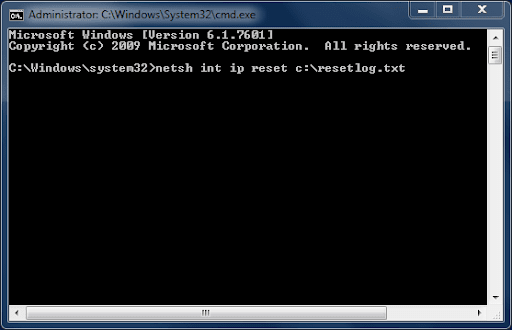
- Right click on the Windows startup icon. Select Command Prompt (Admin) from the list.
- In the cmd window enter: ipconfig / flushdns. This command flushes the DNS cache.
- In the same cmd window, enter nbtstat -RR to update the NetBIOS entries.
- Reset IP settings by running the netsh int IP reset command.
- The last command you need to run from cmd is netsh winsock reset.
- Close the cmd window and restart your Windows 10 system.
Uninstall network adapters

- Click the search icon next to the Windows Start button.
- Enter Device Manager in the search box. Choose the first option.
- In the main window, click Show and select Show Hidden Files.
- Expand the Network adapters section to see the list of adapters on your PC.
- Manually remove the adapters by right-clicking each entry and choosing the Remove option. Skip everything that cannot be removed.
- Click Action and select Check for hardware changes.
- Save changes and reboot the device.
RECOMMENATION: Click here for help with Windows errors.