- Download and install the software.
- It will scan your computer for problems.
- The tool will then fix the issues that were found.
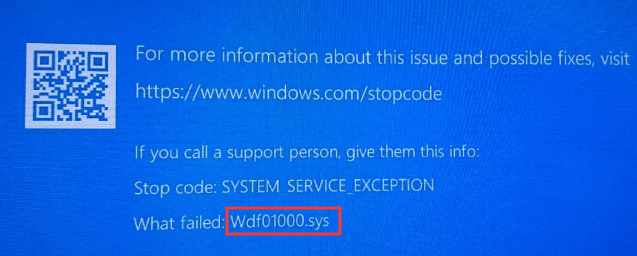
Many users have reported Wdf01000.sys blue screen error when trying to install or run a program. The error also occurs when trying to load a specific driver.
Wdf01000 stands for Windows Driver Framework 01000 and occurs when new hardware or software is installed on the system. This will cause the download of drivers associated with that specific hardware or software that is causing the problem.
BSOD wdf01000.sys accompanies various error messages. The description of this error may be as follows:
- DRIVER_IRQL_NOT_LESS_OR_EQUAL
- SYSTEM_THREAD_EXCEPTION_NOT_HANDLED
- PAGE_FAULT_IN_NONPAGED_AREA
- SYSTEM_SERVICE_EXCEPTION
- KMODE_EXCEPTION_NOT_HANDLED
- DRIVER_VERIFIER_DETECTED_VIOLATION
Unlike most other blue screen errors, here users can usually start the system.
If you are facing a BOSD issue regarding wdf01000.sys Windows 10, this article is exactly what you need. Here are 9 solutions for you to help you solve the problem one by one.
Check for viruses and malware
Viruses and malware can cause various blue screen errors, including this issue with wdf01000.sys. Therefore, scanning for viruses and malware is a wise decision.
You can download and use your favorite antivirus. Plus, Windows Defender is a great antivirus built into Windows 10.
Step 1. Open Windows Settings and go to Update & Security> Windows Security.
Step 2. Click Virus & threat protection to open the Windows Defender Security Center.
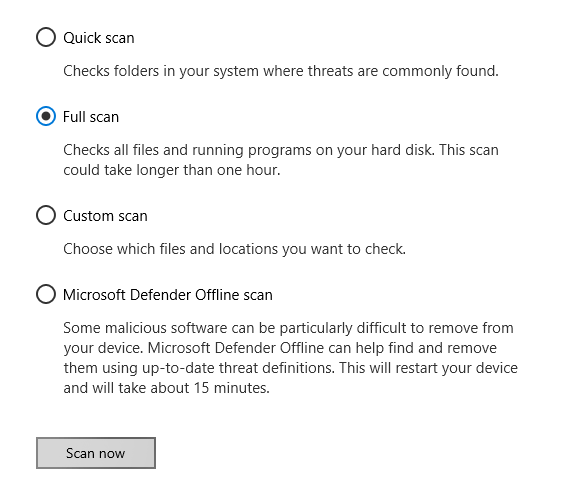
Step 3: In the pop-up window, click “Start new advanced scan”.
Step 4: On the new page, select the Full Scan option and click Scan Now.
After completing the scanning process, your computer needs to be restarted. After restarting your PC, you can check if the problem is resolved. If that doesn’t work, go to the next solution.
Updated: June 2025
We highly recommend that you use this tool for your error. Furthermore, this tool detects and removes common computer errors, protects you from loss of files, malware, and hardware failures, and optimizes your device for maximum performance. This software will help you fix your PC problems and prevent others from happening again:
- Step 1 : Install PC Repair & Optimizer Tool (Windows 11, 10, 8, 7, XP, Vista).
- Step 2 : Click Start Scan to find out what issues are causing PC problems.
- Step 3 : Click on Repair All to correct all issues.

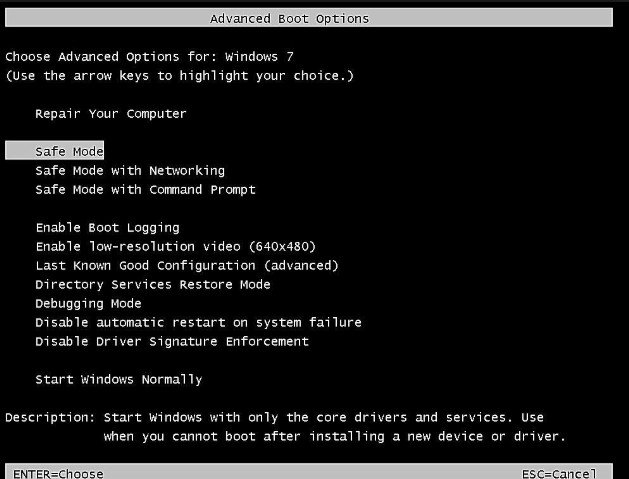
Run Windows in safe mode or in safe mode with network drivers loaded.
Safe Mode is a troubleshooting option that limits Windows to its main functions. In Safe Mode, Windows will only run with the most important drivers and services. In Safe Mode with Network Support, Windows only runs with basic drivers and network support. Follow the instructions below to start your computer in Safe Mode or in Safe Mode on your network:
- Press the Start button or press the Start key and then the Power key. Hold the Shift key when you select Restart.
- From the full screen menu, select “Troubleshooting” > “Advanced Settings” > “Start Settings”.
- In the Launch Options screen, press the “Restart” button. The PC restarts and you are taken to the Startup Options screen.
- Use the arrow keys on your keyboard to select “Enable Safe Mode” or “Enable Safe Mode with Network Drivers Downloaded”.
Launch the Blue Screen Troubleshooter
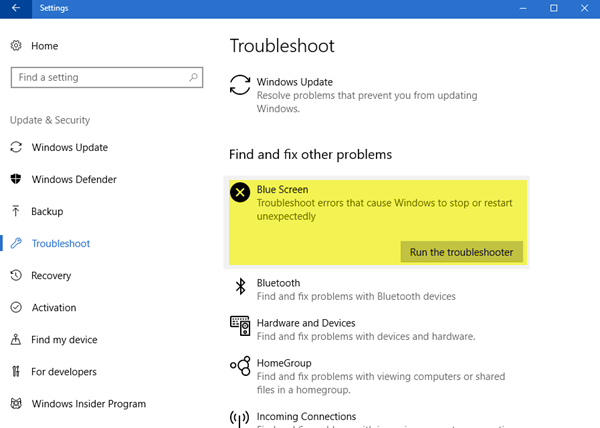
Another new feature in the anniversary update of Windows 10 is the blue screen troubleshooting utility. This blue screen troubleshooting software detects the cause of blue screen errors that may appear on your computer and helps you fix them.
- Open the control panel and change the display settings to Icons.
- Click Troubleshooting, and then click Show All in the taskbar.
- Click on the Blue Screen. The blue Troubleshooting screen appears.
- By default, Apply recovery automatically is enabled, just as you would with all Windows troubleshooting tools. If you just want to run the tool without any automatic fix, click Advanced and clear the Apply Repair Automatic check box. Click Next.
- Let us know in the comments below if any of these solutions have helped solve the BSOD Wdf01000.sys problem.
Save the wdf01000.sys file again.
Reregistering the wdf01000.sys file may resolve the issue if the issue is with the file.
1] Open a command prompt as administrator as described in solution 2.
2] Type the following command and press Enter:
regsvr32 C: \ Windows \ system32 \ drivers \ wdf01000.sys
3] Reboot the system.
RECOMMENATION: Click here for help with Windows errors.